Week 12: Further Development, Elevator Pitch and NHSW Meeting
Digital Health Ecosystem Wales Meeting
Our meeting that was rescheduled from December with the Digital Health Ecosystem Wales took place this week. In the meeting, we presented our platform as well as our intent to use the NHS Wales Login system.
Unfortunately, we were told that their work is quite new and still in the early phase of development. As a result, they made it clear that integrating our platform to their system would be complicated and take a long period of time (we assume several months, at the least).
In addition, similar to as discussed in our previous NHS Identity meeting, we would have to go through formal application and certification processes, which would only add to the required time.
Following this meeting, we seem to have exhausted our official login options, and so we expect to continue using Keycloak as our login backend, along with the join-codes system, as part of this platform.
On the other hand, the team said they will try to investigate further internally and get back to us with more information which we look forward to.
Additionally, our email to the NHS Wales contact provided to us during the NHS Identity meeting responded this week informing us that they are unlikely to be able to help us more than the members of the team we met with.
Frontend
We made major improvements in our frontend this week.
Styling
To make the website more professional and responsive, we met together to discuss and perform initial improvements.
We followed by performing several major enhancements to the website.
Initially we were using Material-UI for our components and styling. However, over the last few months we have had difficulties in integrating the design system into our Next.js app, for reasons including but not limited to, a lack of freely available open-source components, and a lack of customization options.
Following further research on design and component systems, we have now decided to use React Suite for our website.
One of examples of where React Suite was better was for responsiveness. We were previously using the react-date-range component (https://www.npmjs.com/package/react-date-range) for the date picker in the statistics page, however unfortunately this wasn’t responsive and superposed itself on top of the LineChart on smaller screen sizes. In order to fix this, we used the <DateRange/> component from React Suite which is a button that you click on to show the date range picker, which has a much more professional and responsive design.
The changes that we made include:
- Adding a border to the Header, updating the font, and revamping the profile dropdown menu
- Revamp the Statistics page with a new filters section, and more responsive design
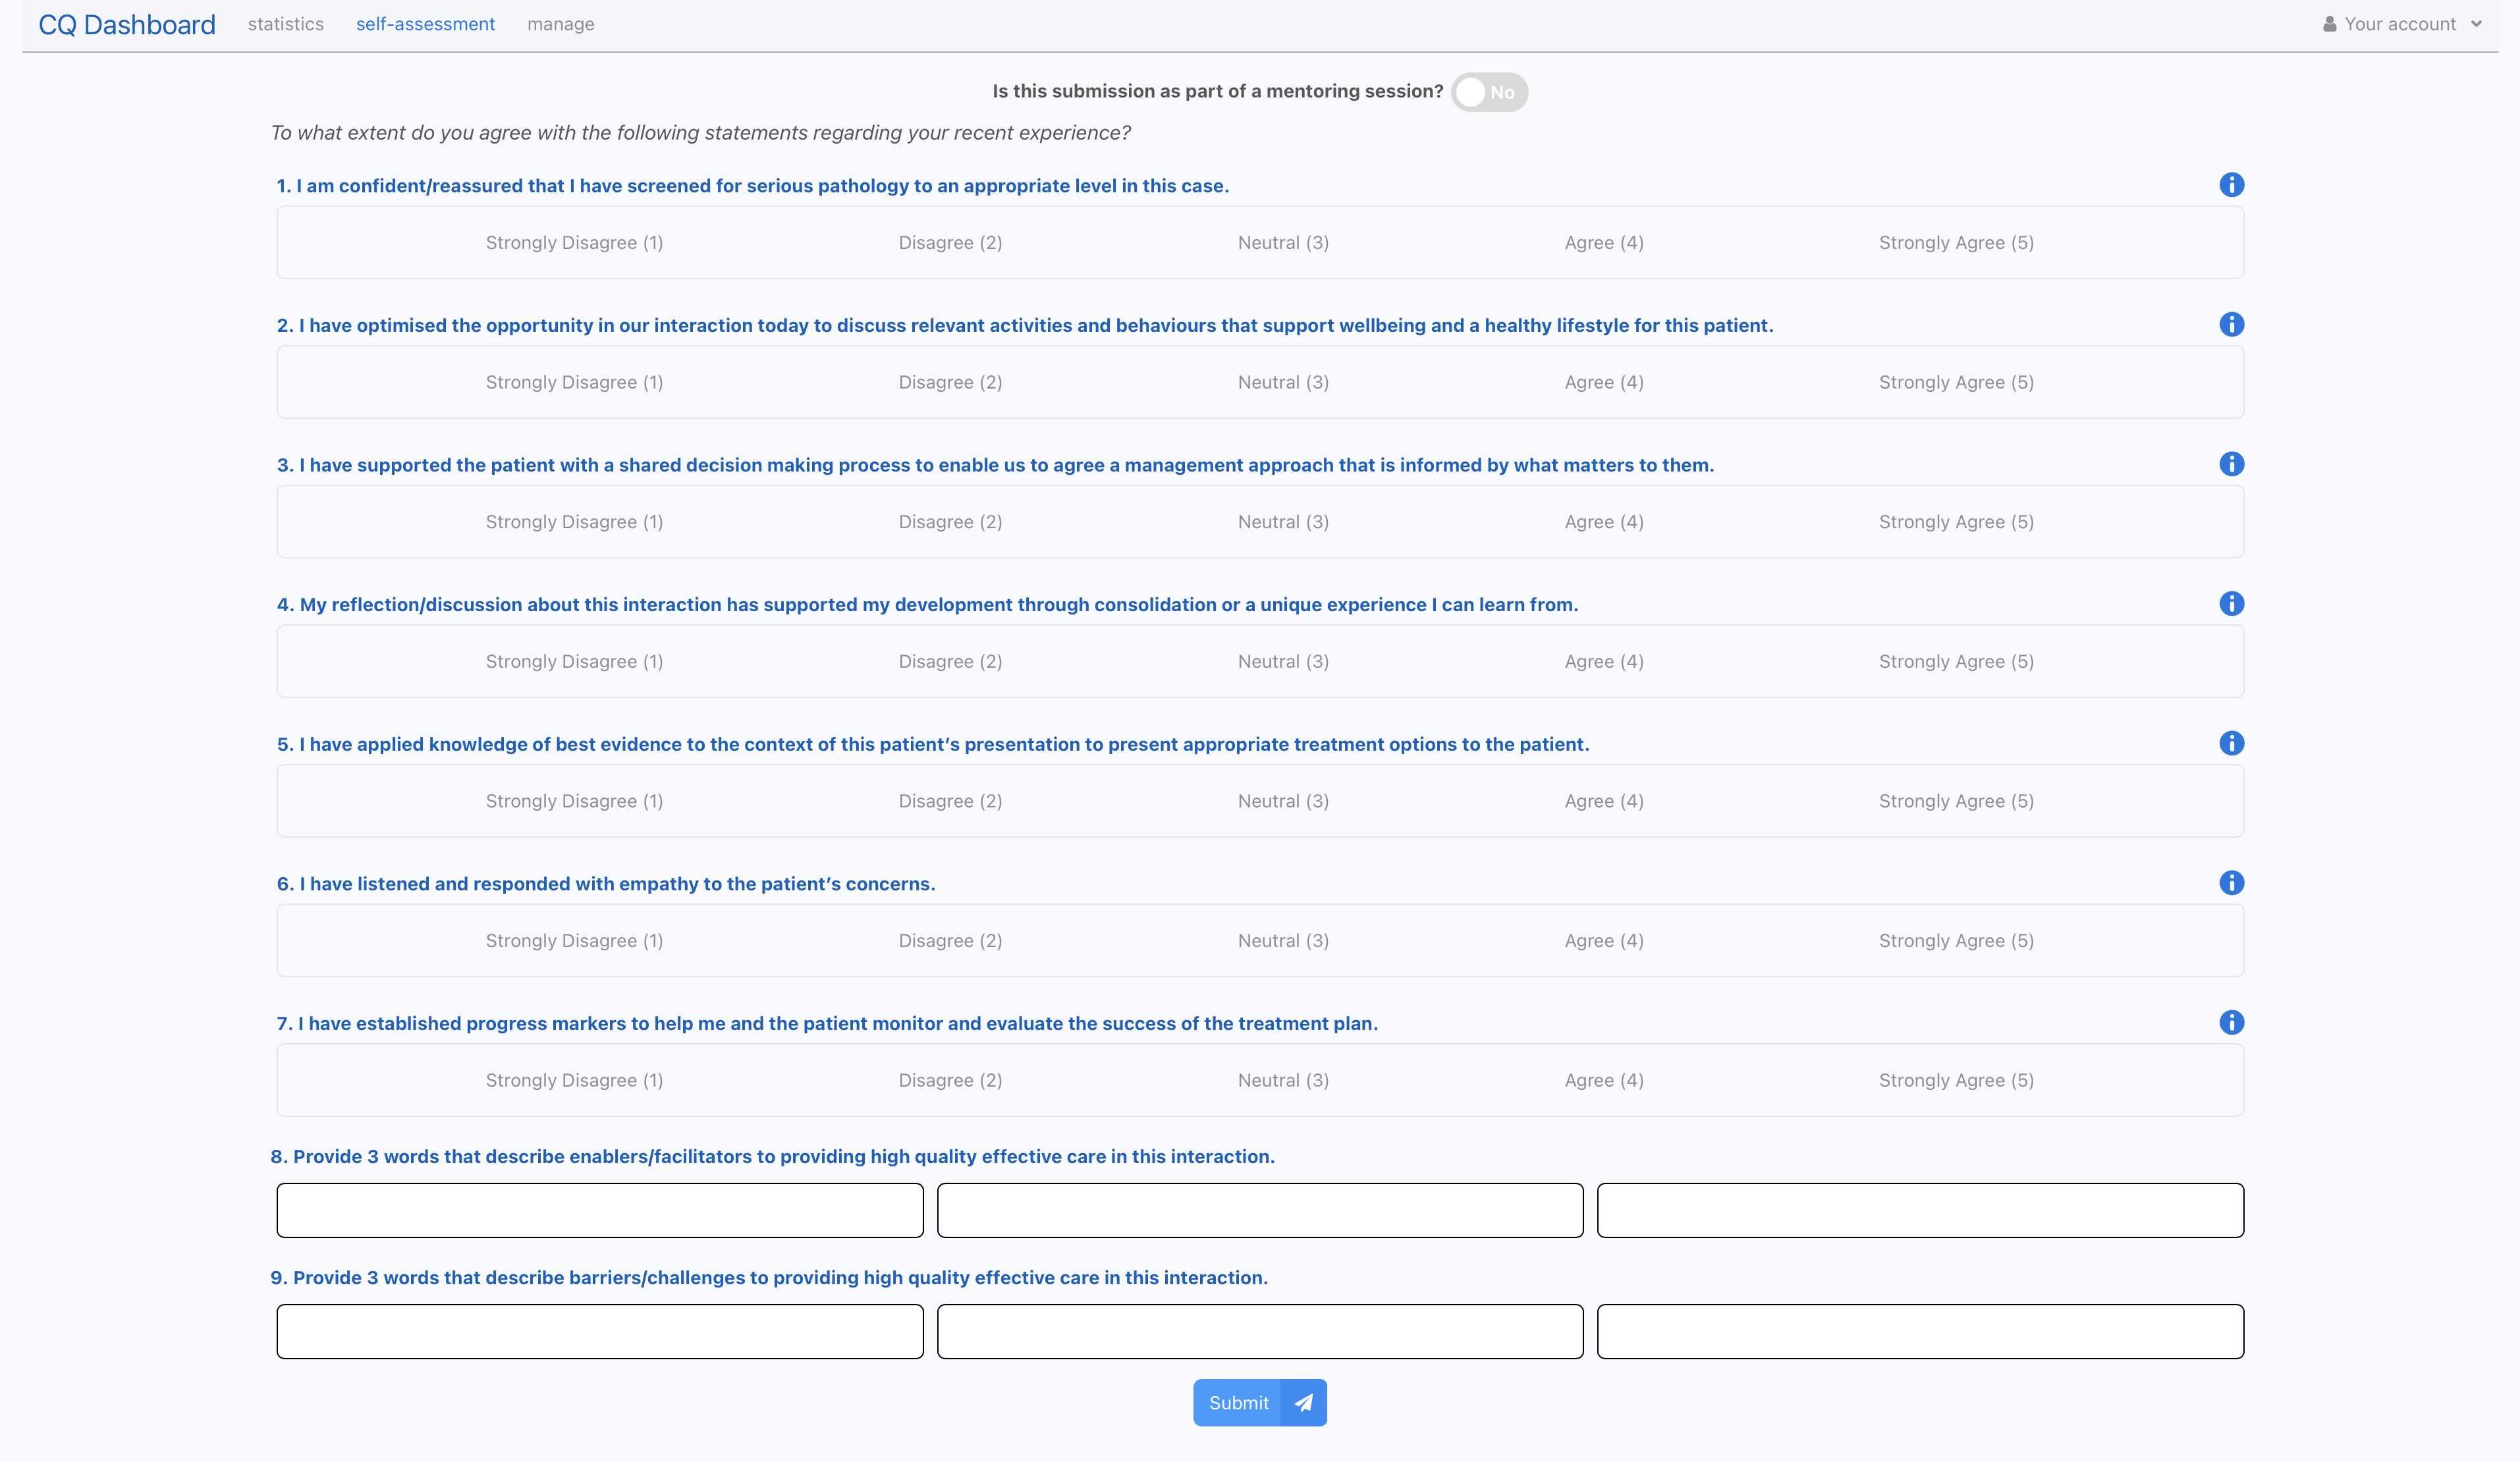
- Revamp the Self Assessment page to add colours to each question, and using a new toggle for the mentoring session question
- We’ve also updated the buttons and general components throughout the system to use React Suite
Unfortunately, we were not able to use the React Suite Table component due to bugs in it’s responsiveness, therefore we are now only using Material UI for table components, found in the various manage pages.
Some screenshots of the new design are below:
New Self-Assessment Page:
New Statistics Page:

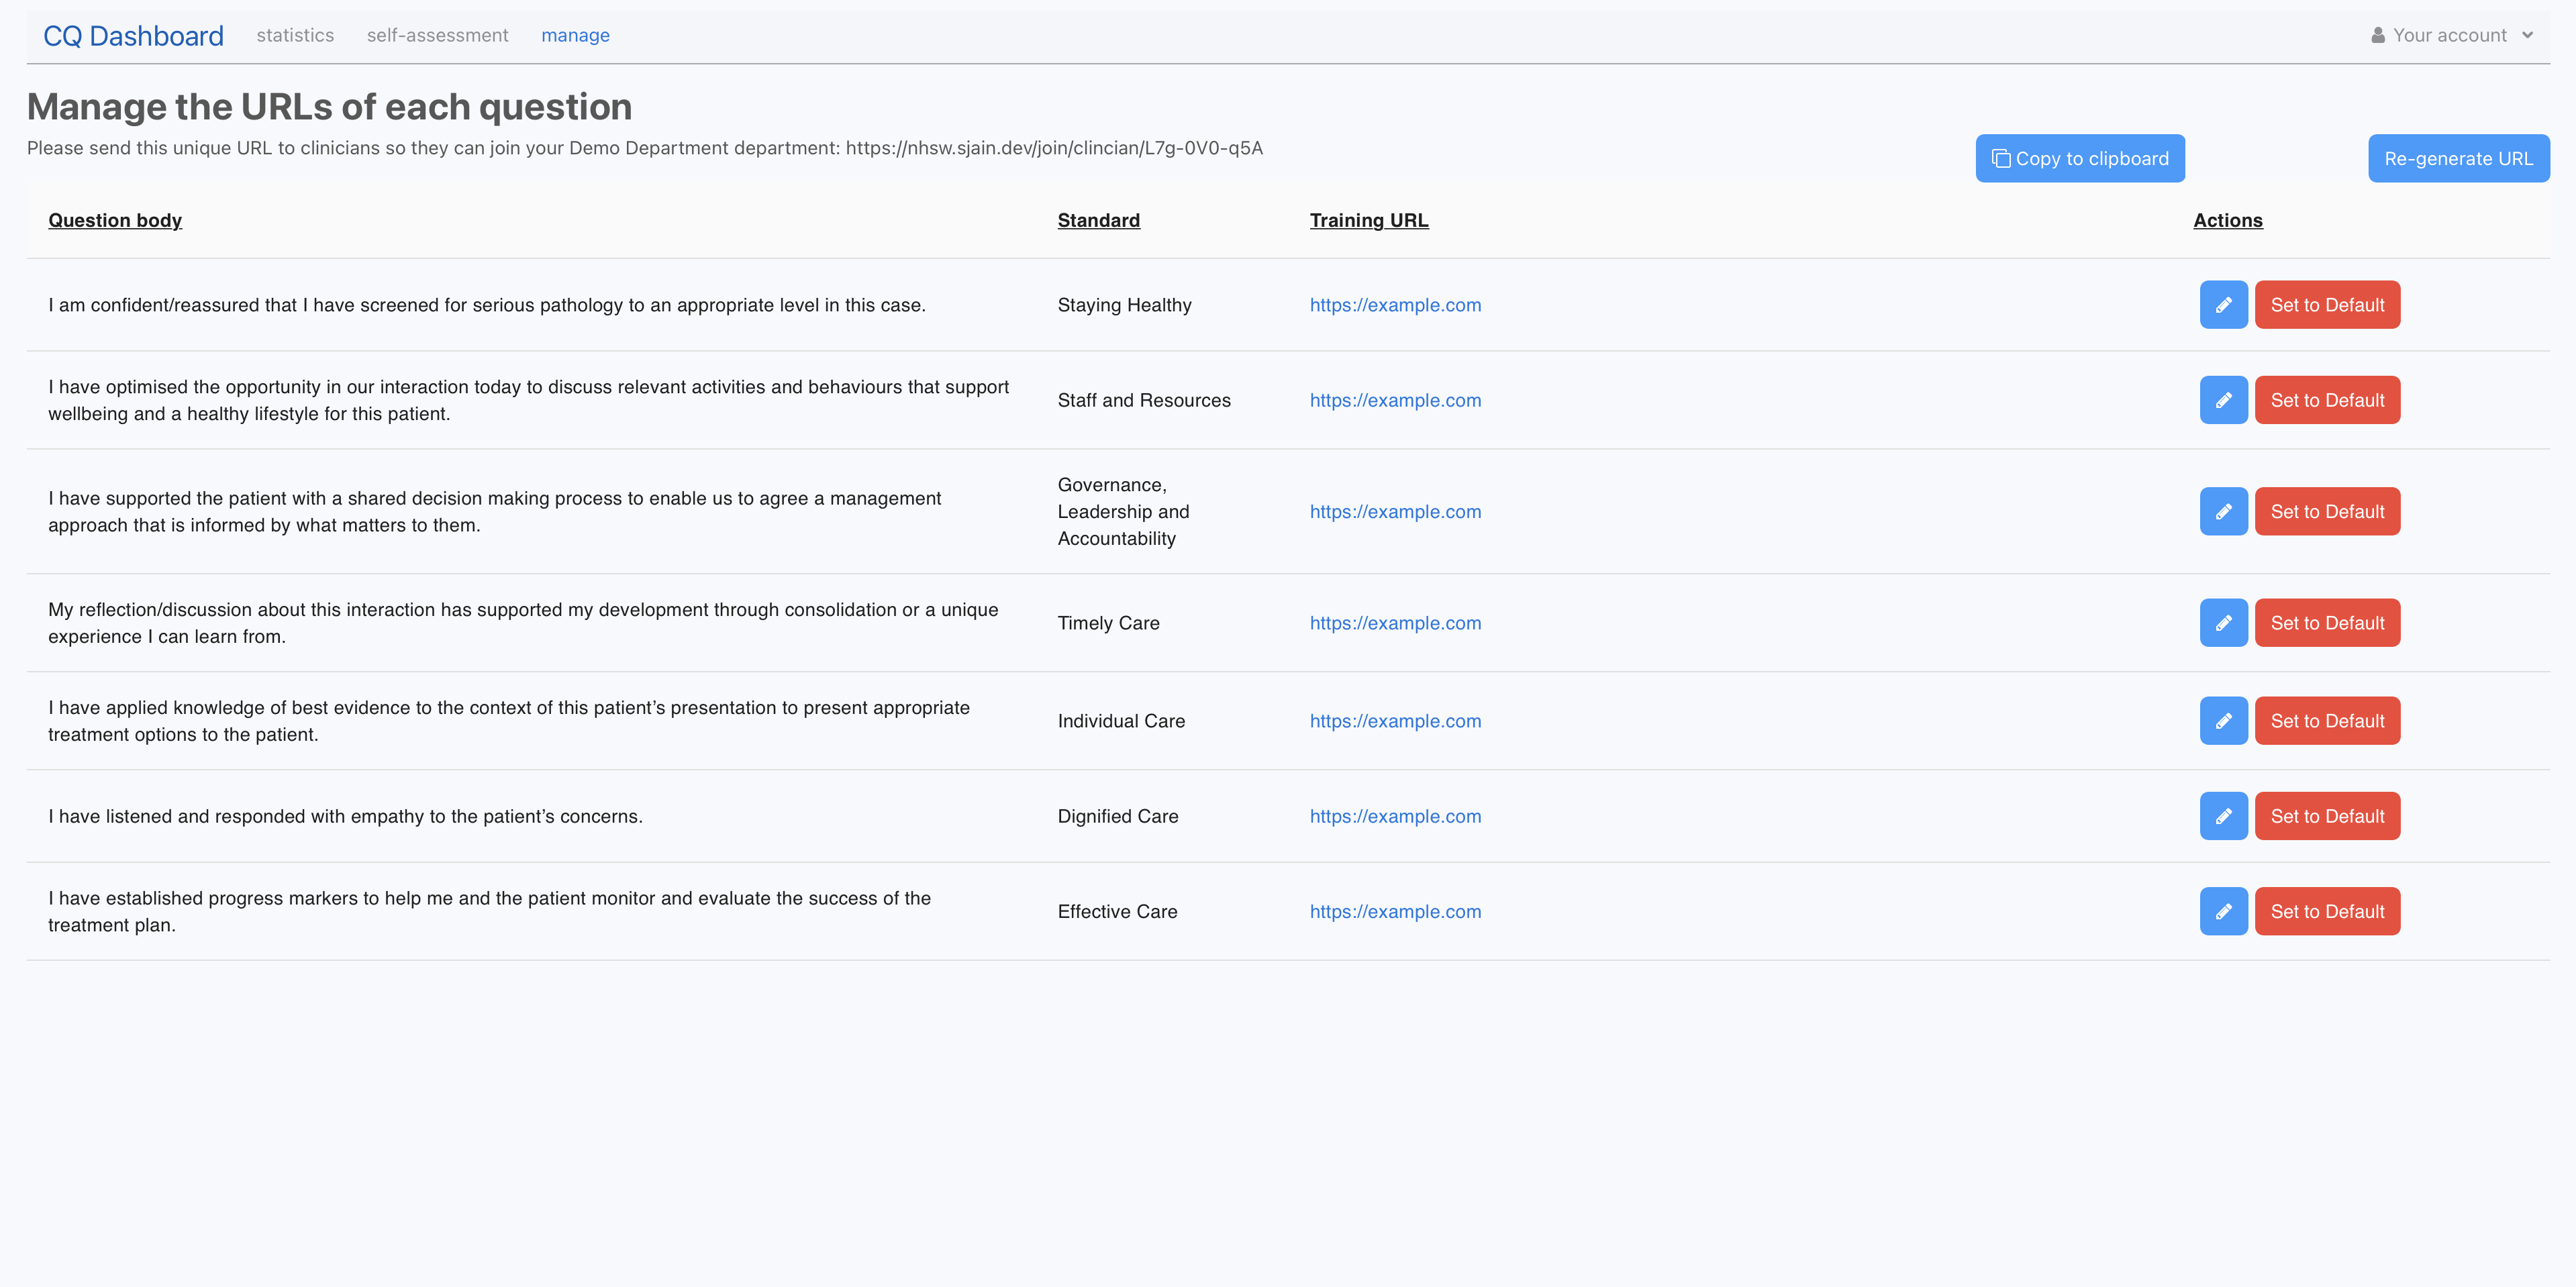
New Manage Page:
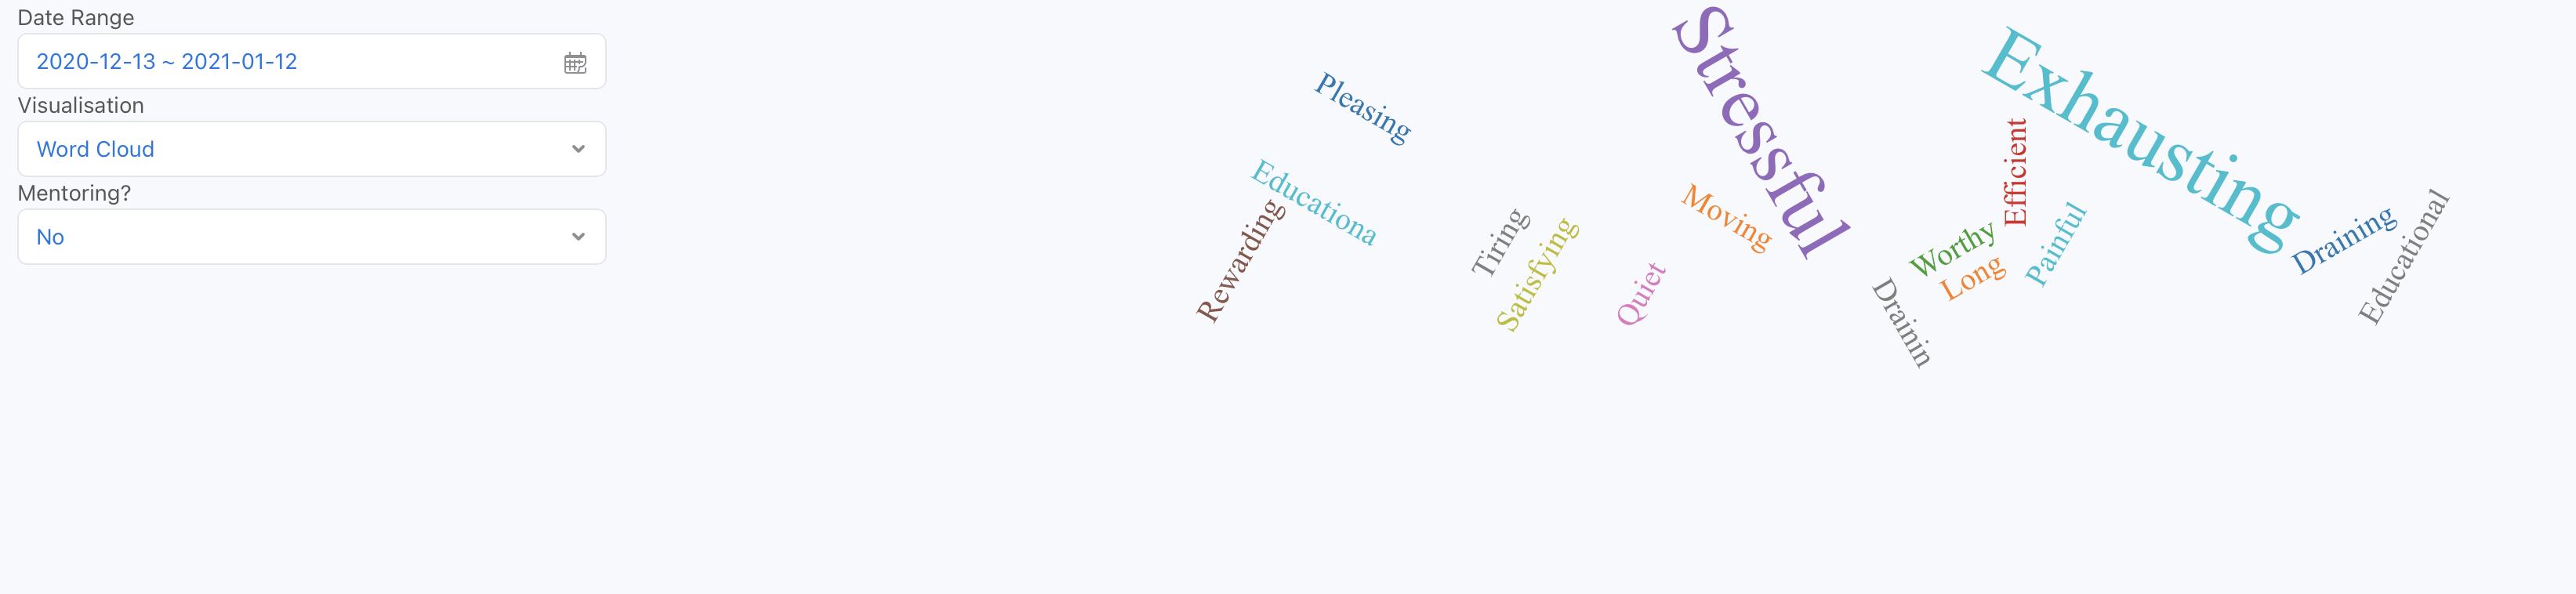
Statistics Page: Integration of Word Cloud
We also fully implemented the Word Cloud into our platform.
This made use of the react-wordcloud https://www.npmjs.com/package/react-wordcloud component, which provided us with an initial styling, word cloud generation, and animations.
We found this component easy to use, with a well documented API that has a wide range of functionality.
We also tied the Visualisation dropdown to the Word Cloud, so when the user selects Word Cloud, the Word Cloud component shows.
Finally, we focussed on connecting the <WordCloud/> component to the backend through the GET /api/responses so that the actual words were being showed. We also had to make sure that the content of the words changed depending on the chosen date range.
In development mode, we are seeding our databases with mock answers, for various timepoints. Each response has words associated to it too:
Join code UI
This week we fully implemented the join code UI onto our platform. This involved implementing 3 main parts: clinician join code in the manage page for departments, the department join code in the manage page for hospitals and the leave department button for both clinicians and department managers.
- Clinician Join Codes (manage page for departments)
The clinician join code functionality was fairly simple as it involved adding a section to our current manage page for departments. To do this we used the <CopyToClipboard/> component from react-copy-to-clipboard for the copying functionality needed.

We then fetched the join code for that department using GET /api/departments/[departmentId] API endpoint, with ‘[departmentId]’ being the the id of the respective department.
Finally we wired the ‘re-generate URL’ button to the PUT /api/join_codes/[...params] API endpoint, with the ‘[...params]’ being again departmentId and also the user type of department manger (as for example a clinician shouldn’t be able to update a department URL).
Like for the URLs and questions in manage pages, we again used the re-fetch mechanism on GET /api/departments/[departmentId] to ensure the department name and join code is in sync with potential changes made by others at the same time.
- Department Join Codes (manage page for hospitals)
The department join codes required more work as this would be whole new manage page for the Hospital manager user type. This page was however similar to the manage questions page so we could use very similar concepts to build it.
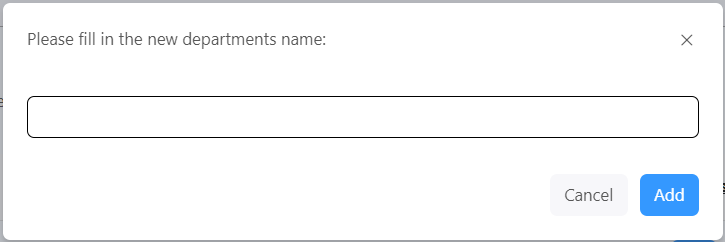
We used the <Table/> component from Material UI, like in previous manage pages, to display the departments in the respective hospital. We then added the copy and re-generate buttons like in the clinician join codes page. Next we added a button to allow the hospitals to create new departments which utilises our <AlertDialog/> component used in other pages.

We then fetched the join codes to be displayed in the table using GET /api/departments/API endpoint which returns all the codes for each respective department.
Next we wired the re-generate button to the same API endpoint as the re-generate button in clinician join codes, except this time with the user of hospital manager.
Lastly we wired the add department button to the POST /api/departments/ API endpoint, which adds a new department to our database and internally also creates a join code for that department automatically. Again we used the re-fetch mechanism on GET /api/departments/ to ensure the table is in sync with potential changes made by others at the same time.
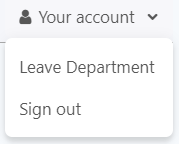
- Leave department button
We needed to give clinicians and department managers an option to leave their department as they may want to change departments. To do this we added a button to our <ProfileButton/> component in our header and then wired it the POST /api/departments/ API endpoint, which removes that person from their respective department in the database, which allows them to join another department.
Elevator Pitch
As part of the module we need to present an Elevator pitch next week. This is a 2 minute event that uses the following structure:
- Present the problem, and background of our project
- Our Solution: a one sentence summary of what the system does and what
- Our Goals: What we want to achieve with this webapp in order to help the hospital personnel in the best way possible
- A Quick Overview of our solution, presentation of the different functionalities that it offers
In order to prepare for this event, we met multiple times during the week and worked on the presentation as well as on what each of us will say during the pitch. This revealed to be quite a challenging exercise as we have to be straight to the point, say a substantial amount of information, all the while being interesting and captivating the audience.
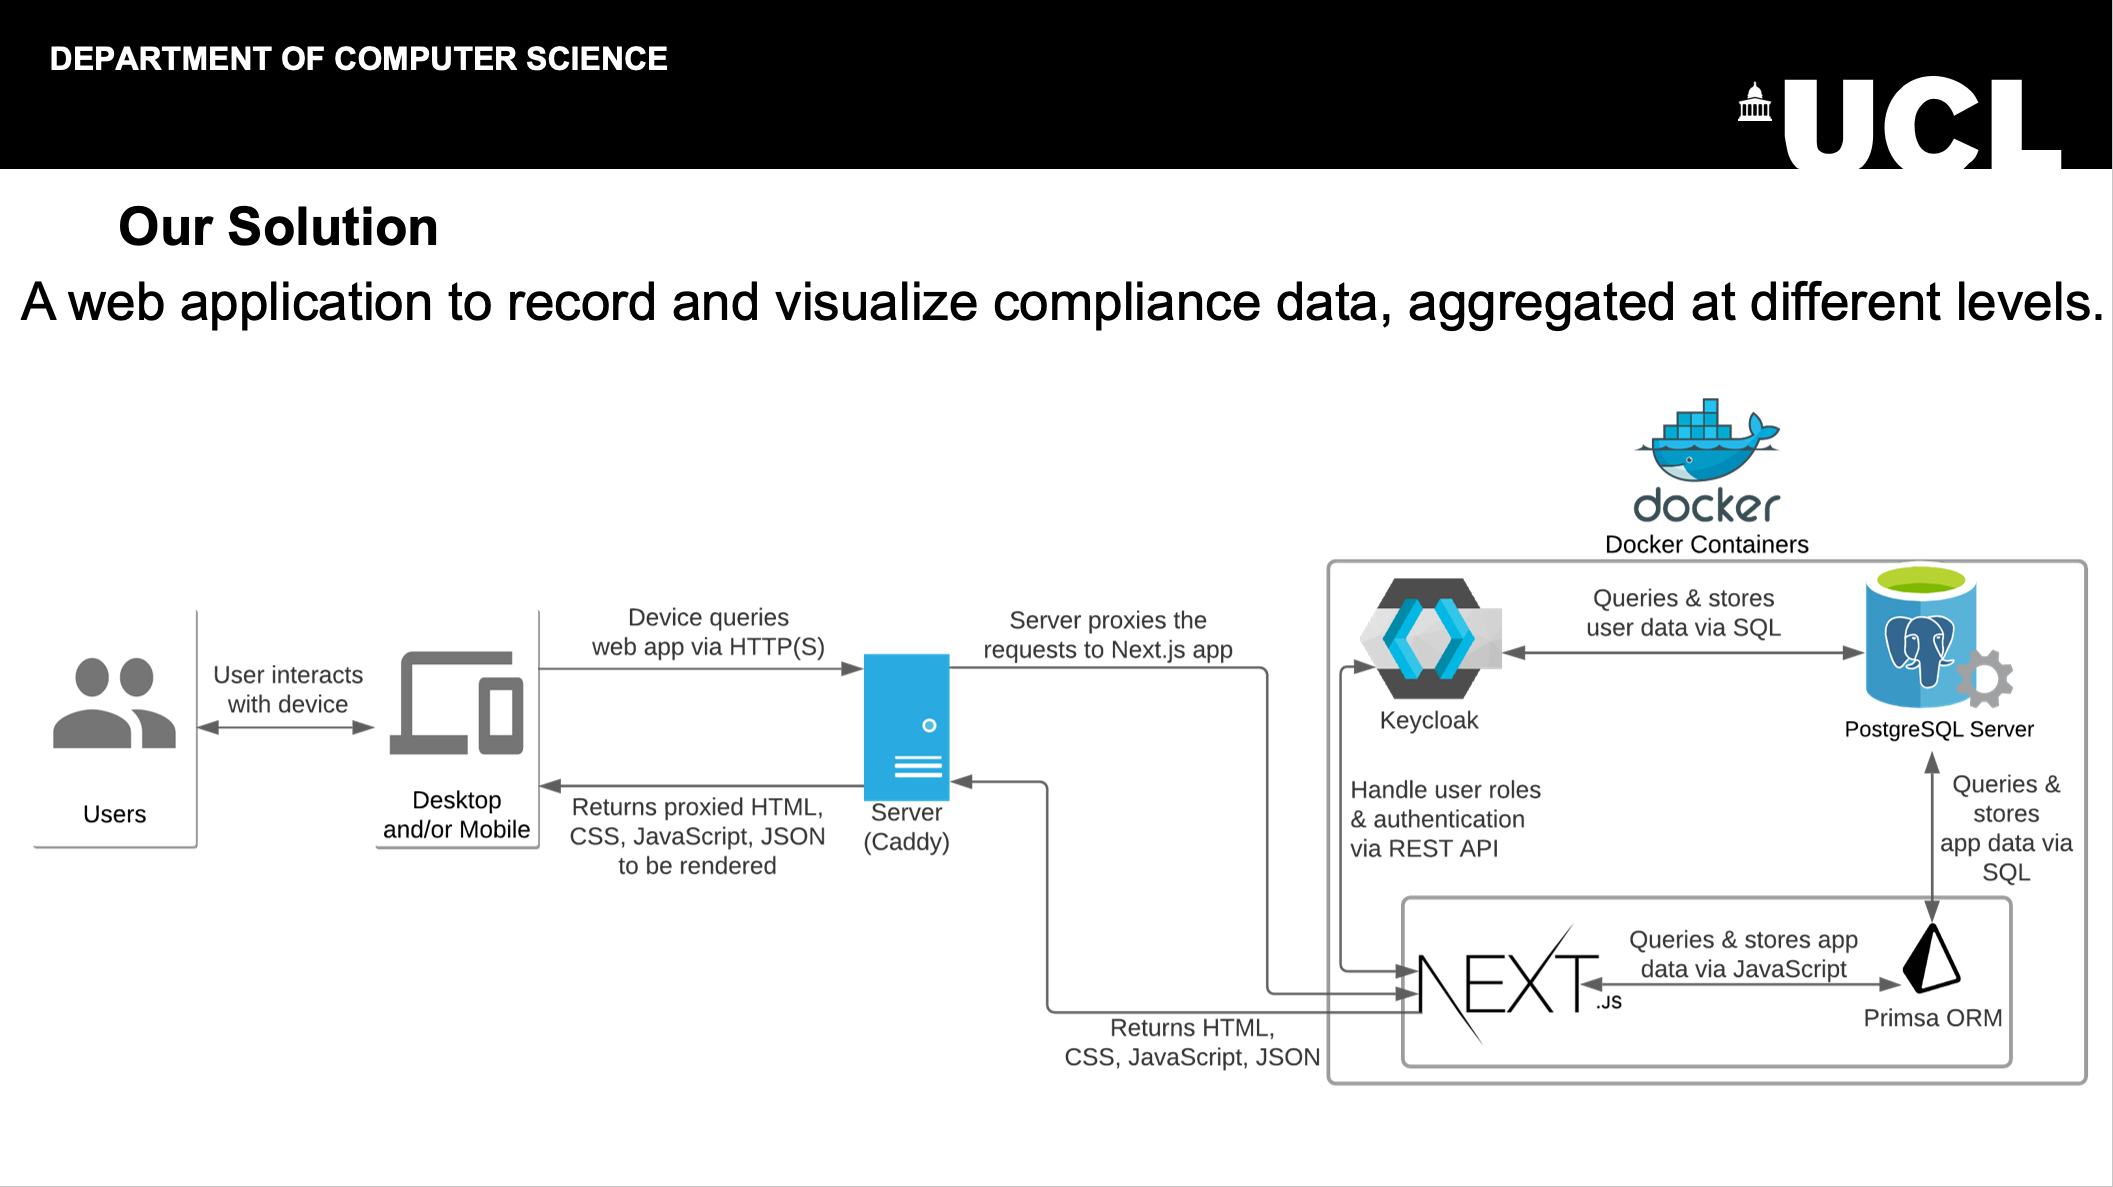
Below is the slide showing our solution as well as a System Diagram that resumes the overall functioning of the webapp.
Website Report
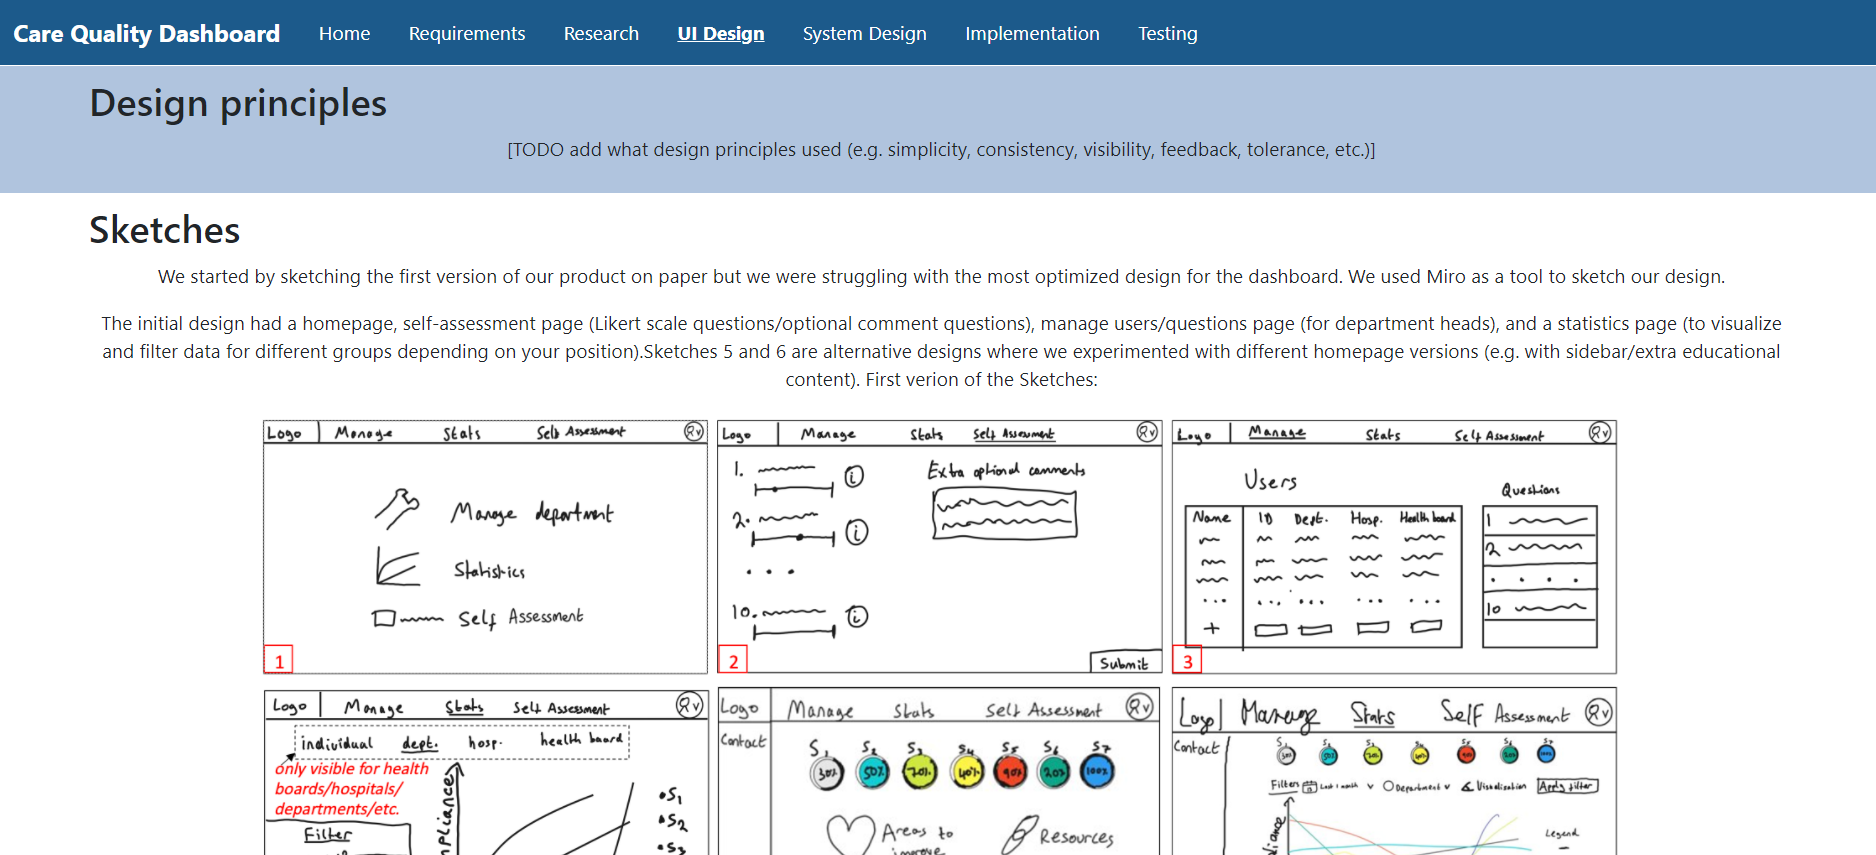
We spent the remaining time of the week working on writing new content for the website report as well as restyling it in order to make it more presentable. The report Website talks about our Requirements, Research, UI Design, System Design, Implementation and Testing. We also have a Home Page that gives a short introduction about each member of the team.
Here is a screenshot of how it looks currently:
Next Steps
This week, we will be presenting our elevator pitch and presenting the MVP of our product to our client. The client should then be showing our product to the clinicians by the end of the week so that they can start testing the webapp and give us feedback for future iterations and additional featuers that we will be working on in Term 2.
Finally, we will be starting to do the polishing tasks for our platform (see GitHub Issues) all the while working on styling (adding a footer, dark mode etc) to make our website more professional and closer to production.