Week 7: Architecture, Development, Continuous Deployment & Login Option
This week we continued to work on the development of the self-assessment tool, created an initial database schema, and set up continuous deployment of our project. We also performed more research on login system options.
Login System research
We have some exciting updates on the login system front.
NHS Identity
We now have a confirmed meeting with the NHS Identity team next week (W/C 7 Dec 2020), to discuss our project, our requirements, and our potential use of NHS Identity further.
We hope to have a productive call and provide an update next week!
Digital Health Ecosystem Wales
We also now have a confirmed meeting with the Digital Health Ecosystem Wales team the following week (W/C 14 Dec 2020), to discuss our project and requirements further.
One thing we were told was that the Developer Portal is currently in its early stages, so a Sandbox Access Control AC3 API is not available at the moment. As a result, to use the production API we would need to go through the formal review process, if we were to use it.
Once again, we hope to provide an update soon.
Other options
Whilst the confirmed meetings are great news, it is now clear that we will not be able to use any of the above options during this Term, as the meetings and review process will take longer to complete.
As a result, we’re planning on implementing an alternative basic authentication system, to ensure we don’t fall behind as a result of waiting too long for the official processes to complete, and as a backup in case we are not able to use the official authentication methods.
We researched authentication options for Next.js and discovered NextAuth.js which seems to be a very promising open-source library for authentication in Next.js, supporting many different kinds of login: social, email/password, OAuth services, and more!
The flexibility of this library, and the fact that it is open-source, is very appealing to us, as it may mean that regardless of the authentication backend, we could use this library to connect the web-app to the authentication system with relative ease.
For the remainder of this term, we hope to experiment with this library, and perhaps Keycloak as mentioned in previous posts, to implement a basic authentication system for the web-app.
More updates will be provided as we progress.
Database design
This week we also worked on creating an initial database schema, and UML/ER Diagram. We used our IPSO Chart to help do this, and found it very helpful to have a list of storage requirements already there so we could build up our design progressively.
Like many database designs, this is subject to change, however we believe it is suitable for our requirements at this time.
Our UML/ER Diagram can be found below, which we created using Lucidchart’s free education package:
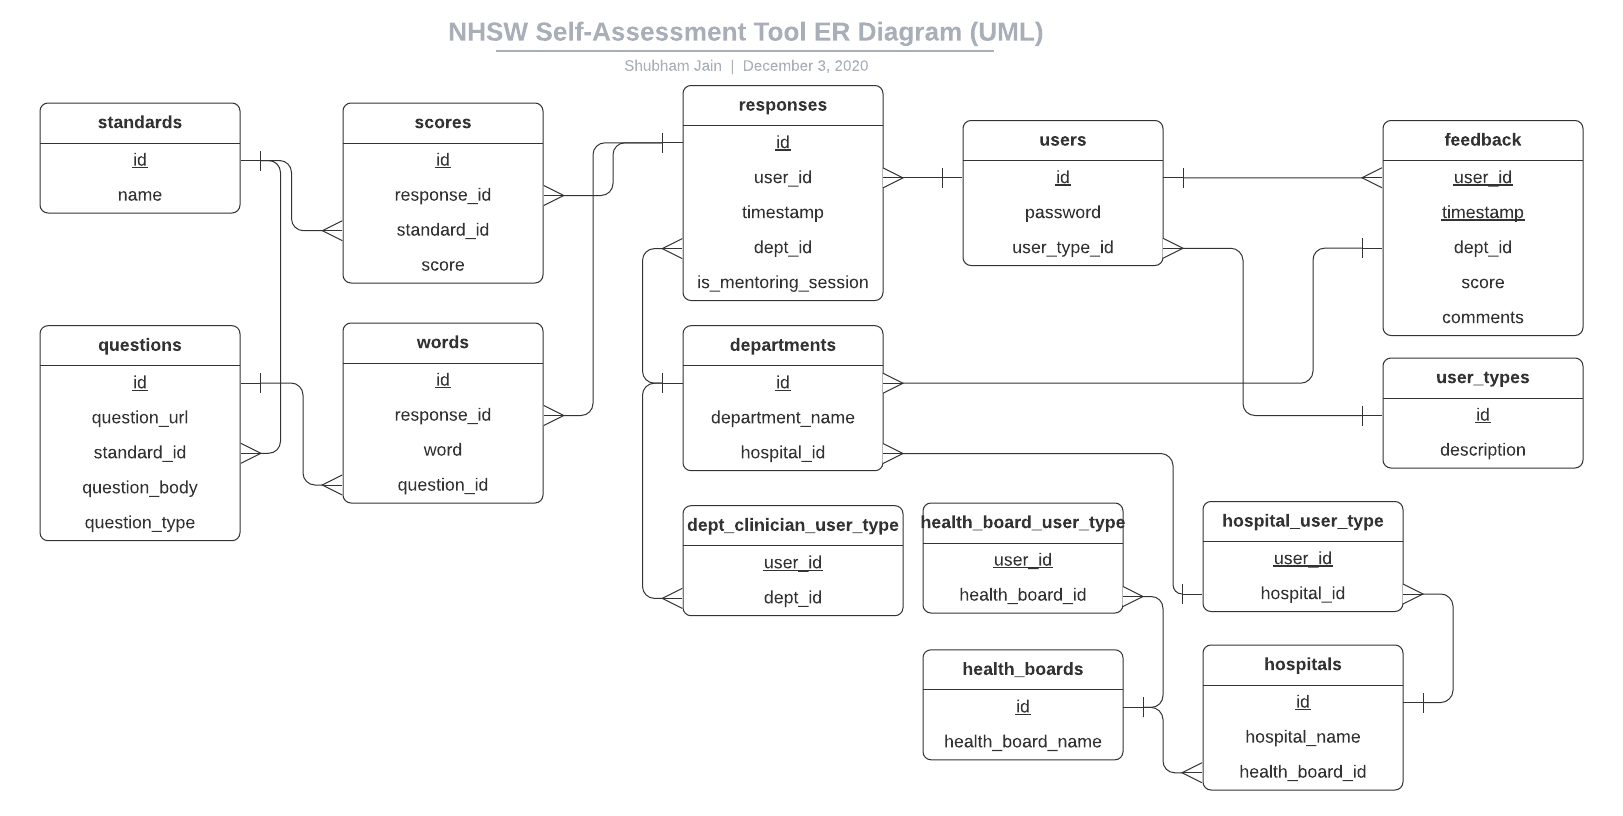
As you can see, we have various tables and relations. Primary keys are underlined. Perhaps the less intuitive part is those table relating to user_types. We decided to take this approach as we realised that each user type (e.g. clinician, department, hospital, health board, etc.) has different metadata associated to them (e.g. clinicians/departments have a corresponding department, but hospitals have no department, and health boards have no hospital!).
There were seemingly two options to go about this:
- Have a few nullable fields in the
userstable (e.g.dept_id,hospital_id,health_board_id, etc.) that were leftNULLwhen the fields weren’t appropriate for the corresponding user - Create separate tables to store the extra metadata for each user type
We decided on the second approach, as it was more normalised, and would make querying simpler for specific users of specific types. Storage was less of a concern, as PostgreSQL needs just 1 bit to store null values, however the trade-off seemed worthwhile.
Continuous Deployment
This week, our client was able to configure a Virtual Private Server instance for the project on Linode. This is a Shared Instance, for which we decided the 1GB RAM/1 CPU Core would suit our needs.
As a result, we have now decided to use our GitHub repository’s main branch as the ‘production’ version of our platform (or, for the moment, the latest working development version).
From now on, we will each be working on separate areas of the platform on our own Git branches, and creating Pull Requests to have a team member review before merging into main. This means we will be following the GitHub Flow, following best practices to ensure our code is of the highest standard, and making full use of the features GitHub provides us (e.g. Pull Requests).
We set up Continuous Deployment to the Linode server using GitHub Actions. After researching, there seemed to be various options to accomplish this. Some examples are:
-
Use a bare Git repo on the server, combined with Git hooks, to run a bash script when the
mainbranch is pushed to. This bash script would perform actions such as pulling the latest code from the repository, installing new dependencies, and restarting the web server.An example tutorial written by Digital Ocean on this method can be found here.
-
Use GitHub Actions to SSH into the server when the
mainbranch is pushed to, which copies the relevant files from the repository to the server using the standardscporrsynctools, as well as then installing new dependencies, and restarting the web server.An example GitHub Action to perform this can be found here.
-
Containerise the application using e.g. Docker, and when the
mainbranch is pushed to, build a new Docker image, and SSH into the server to pull the latest image and restart the container.An example GitHub Action to run a command via SSH can be found here.
Many more options were researched and considered. We decided on the final option listed above, with some tweaks.
A challenge was deciding how and where to push our Docker images. There seemed to be three popular options: Docker Hub, or GitHub Packages, or GitHub Container Registry.
We decided against Docker Hub as it would require a paid subscription to be able to host private images, which is important for us especially during the initial development phase. We also decided against GitHub Container Registry, as it is still in beta testing from GitHub which we did not want to rely on for potential production usage.
As a result, we are now using GitHub Packages combined with GitHub Actions. The Continuous Deployment process is as follows:
- A GitHub Actions Workflow runs whenever the
mainbranch is pushed to - The Workflow checks out the latest code
- The Workflow uses GitHub Secrets to securely store encrypted secret information such as PostgreSQL database connection string
- The Workflow writes to a new
.envfile in the root of the project, and then builds the Docker Container for our web-app, using our customDockerfileto package and containerise the platform - The Workflow connects to the server using SSH and a private key (also securely stored via GitHub Secrets), to run a command along the lines of
docker-compose upto pull the latest image, rebuild and restart the containers - The server is running Caddy to act as a reverse proxy to the Next.JS app inside the Docker Container, publishing it to port 80 of the server
Overall, this was quite challenging and took a few days of research, investigating, and trying out different configuration options with GitHub Actions, Dockerfiles, Docker Compose, and GitHub Packages. However, we’re pleased that this is now working, as it has enabled us to share a URL with our client and users so they can see our development progress in the coming months.
If you would like access to the website, please get in touch with us.
Project managment
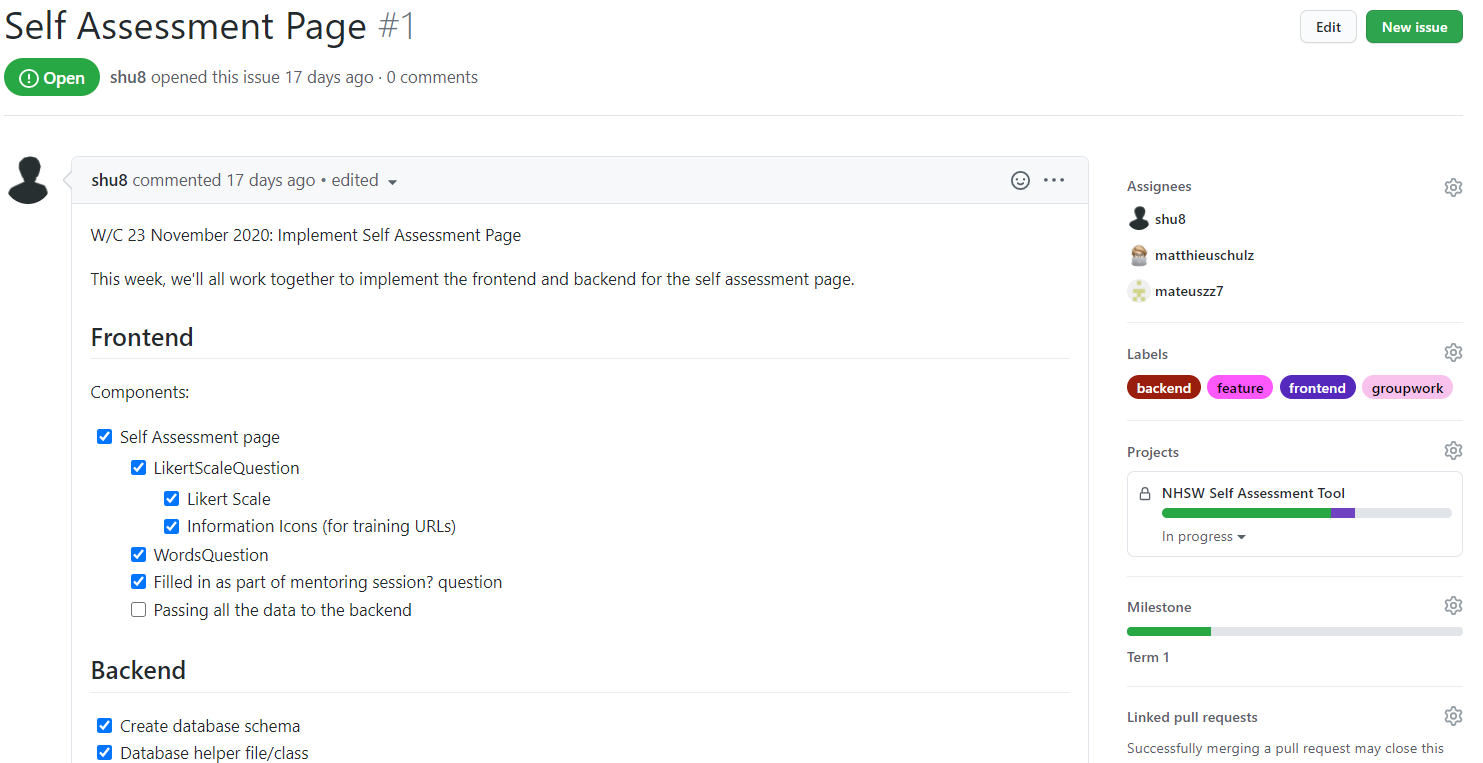
This week we are finishing using pair programming as our main development strategy and so naturally need some way of allocating tasks individually. For our project we have both a Notion and Trello board which both provide ways of allocating tasks however as we are using GitHub for our code anyway, we decided that the best choice was for us to use GitHub’s built in project management, in the form of Issues and Projects. This provides us an easy way to allocate tasks using issues, which include useful things like labels, comments, milestones and assignees etc. Example first issue:
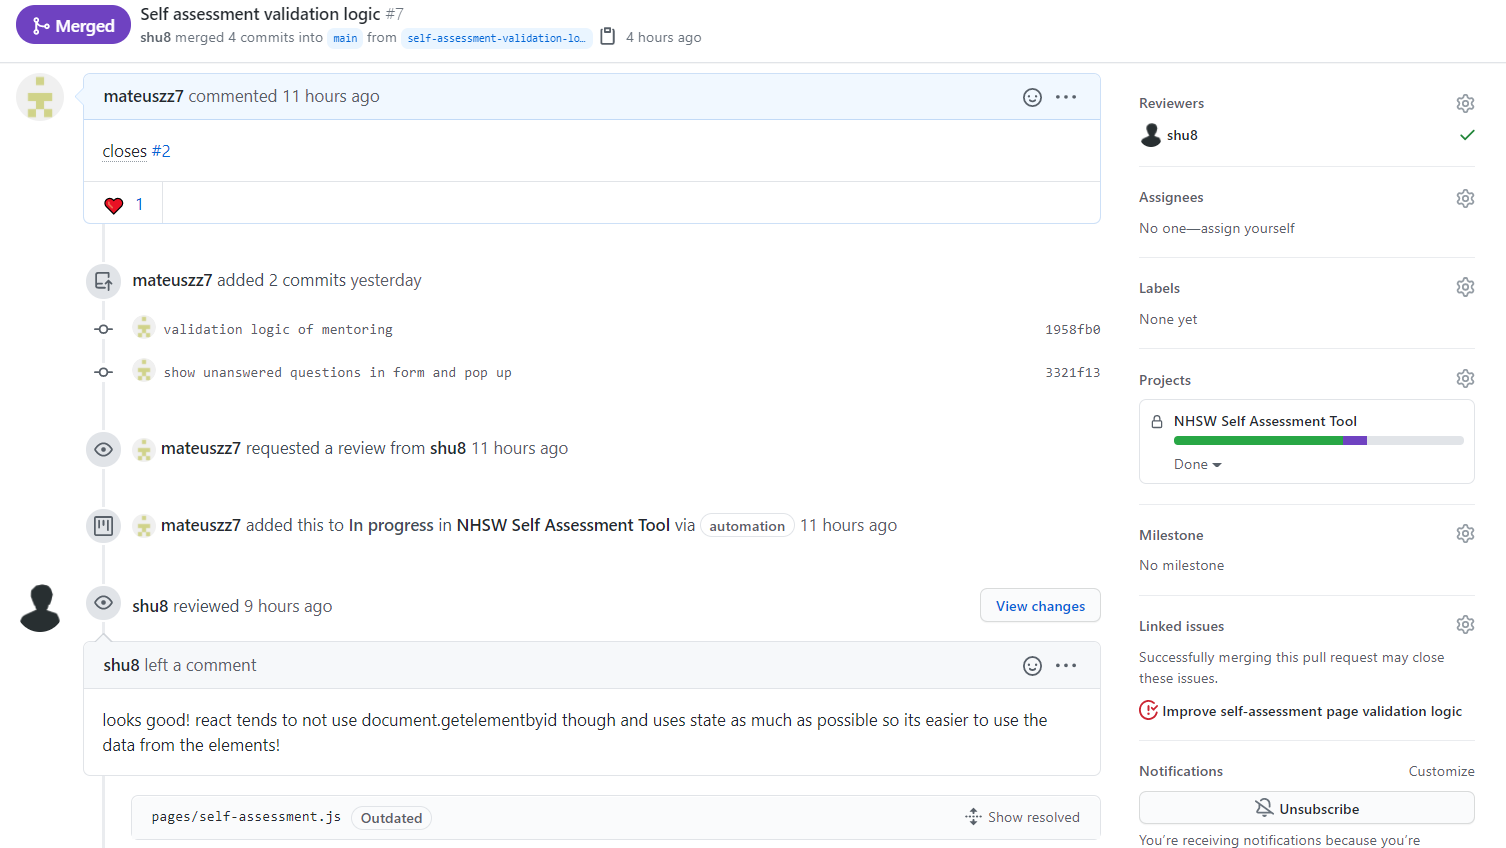
This way of managing our project also allows us to use PR’s (pull requests) in our project, which we will link to each issue created. This means that every time we want to implement something new we have to create a new branch, meaning the main branch won’t be broken by something new, and once we have finished implementing something new we can create a PR to request to merge to the main branch. For each PR we will request a code review from someone else which gives us another advantage of code being double checked twice, and the reviewer can suggest new changes before the reviewee can merge. Example first PR:
Backend development
We have decided this week to work on the database and creating API endpoints to it. We could choose from different options to interact with our database, but ended up going with Prisma. Prisma is a next-generation ORM that can be used to build GraphQL servers, REST APIs, microservices & more.
We’ve read articles like “What is an ORM and Why You Should Use It” (https://blog.bitsrc.io/what-is-an-orm-and-why-you-should-use-it-b2b6f75f5e2a) and think that it would make development easier and more maintainable after the initial set up, as it will handle things like transactions, relational integrity, and input sanitisation for us automatically, letting us focus on the actual data instead. It also makes it easier to insert data into related tables ‘at the same time’ in the code, making it easier to understand when reading/writing the code.
Once we decided on Prisma we built our database using a schema based on our UML/ER database diagram. We’ve decided on using PostgreSQL as our Database Management System (DBMS); in particular, we needed a relational database. PostgreSQL also has advantages over other systems like MySQL in that it is full open-source and community-driven, meaning all features are guaranteed to be available to us, unlike MySQL. PostgreSQL also has a lot of documentation and has over 25 years of active development ensuring reliability and robustness.
We are also happy to commit to PostgreSQL because using Prisma as our ORM meant many of the database-specific implementations were abstracted away, meaning if we needed to switch for any reason later down the line, we could easily do so.
With our database built and ORM decided we could start building our first API endpoint. Just like with the front end, we decided to use pair programming (using visual studio’s live share extension again) to create the first API endpoint so that all of us got a good understanding of how it actually works and it also brings the benefit of higher quality code due to all of us checking it as it is being written.
We created the GET and POST endpoints for our /api/responses endpoint and then used it naively to test the functionality in the self assessment page using the console.log() functionality and Postman. With a few tweaks to the API to make it work with Prisma’s data relations that were causing errors, we ended up testing the API endpoint successfully. Knowing how Prisma relational queries now work, we hope to create the remaining endpoints needed in the coming weeks.
Frontend development
Continuing our development this week with React using the Next.js framework, we improved the self assessment and began implementing more functionality to the statistics page.
Self-assessment page
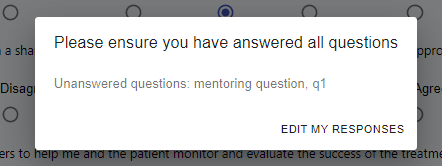
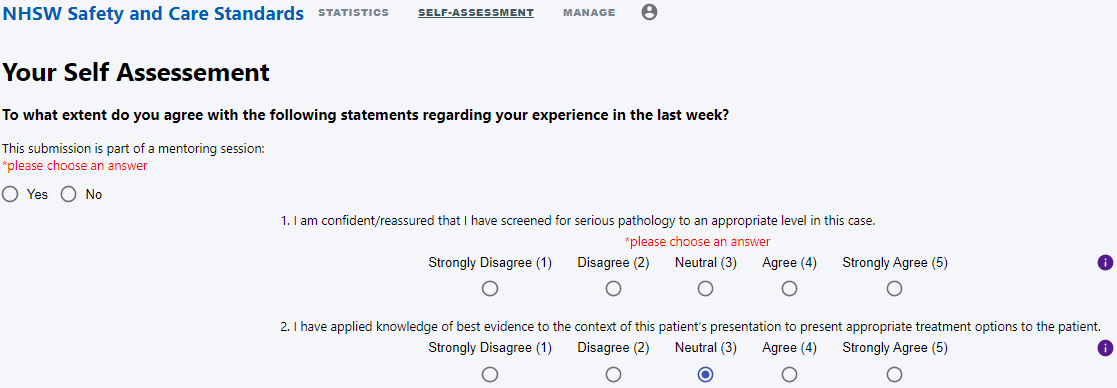
From last week we had a self-assessment page with the core functionality but still missing the validation logic and the feature of making unanswered question easily visible to the user. To add these features we used Reacts useful feature of state, allowing us to write simple validation logic for unanswered questions, and wrapping error elements around questions, so error messages only show when an answer is unselected. Also, when the submit button is pressed we used a simple loop to show which questions have been unanswered in an <AlertDialog/> and the option to continue editing responses.
This was a very necessary improvement for the user experience of our system as now users will be clearly informed twice about which questions have been unanswered, leading to no confusion about why the form is not being submitted. Examples of these below:
Statistics page
This week we have also planned and started to build the statistics page with all the features we require for our system.
We have decided we will need to create are our own <GraphWrapper/> component that will consist of filters, legend and a graph. This component will take data from the API based on the what the filters specify and then display this using the graph component from Chart.js mentioned in the earlier Week 6 post.
Lastly in our prototype we had ‘circles’ summarising average compliance to-date within a collapsible block. To achieve this we looked at the different components available to us through Material UI and Chart.js. We decided that the best option for our system would be using the doughnut type chart from Chart.js for the ‘circles’ and the <Accordion/> component from Material UI to make them collapsible.
We hope to have this fully working next week.
Next steps
We’re now working more independently on various different aspects of the project.
Next week, for the the backend (assigned to Shubham) we hope to start implementing a login system, and for the frontend (assigned to Matthew and Mateusz) to implement everything needed for the self assessment page, create a manage URLs page and pass data to/from all pages to the backend.