Term 1 Summary
Summary of project
This Term we discovered the project that we needed to work on: Care Quality Dashboard.
This platform aims to provide a method for NHS Clinicians to perform honest regular self-assessments on their compliance against the NHS Wales Health and Care standards over time.
The aim is to be able to visualise this data at clinician, department, hospital, and health-board levels, to be able to determine which areas are doing well and which require improvement.
At the moment, this data simply does not exist; staff have no method of determining their compliance at all, except for a single manual audit check performed with regards to a single standard.
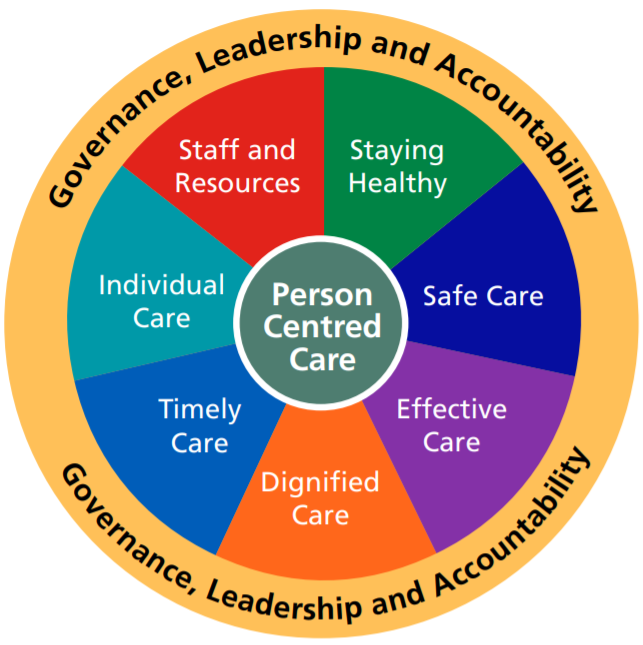
The Health and Care standards are shown below [from gov.wales]:
MoSCoW Requirements
Early on in the project, we scoped out our requirements and discussed with our client and users what would be needed from the project. Our Human Computer Interaction (HCI) research involved user interviews and questionnaires, which influenced our final requirements.
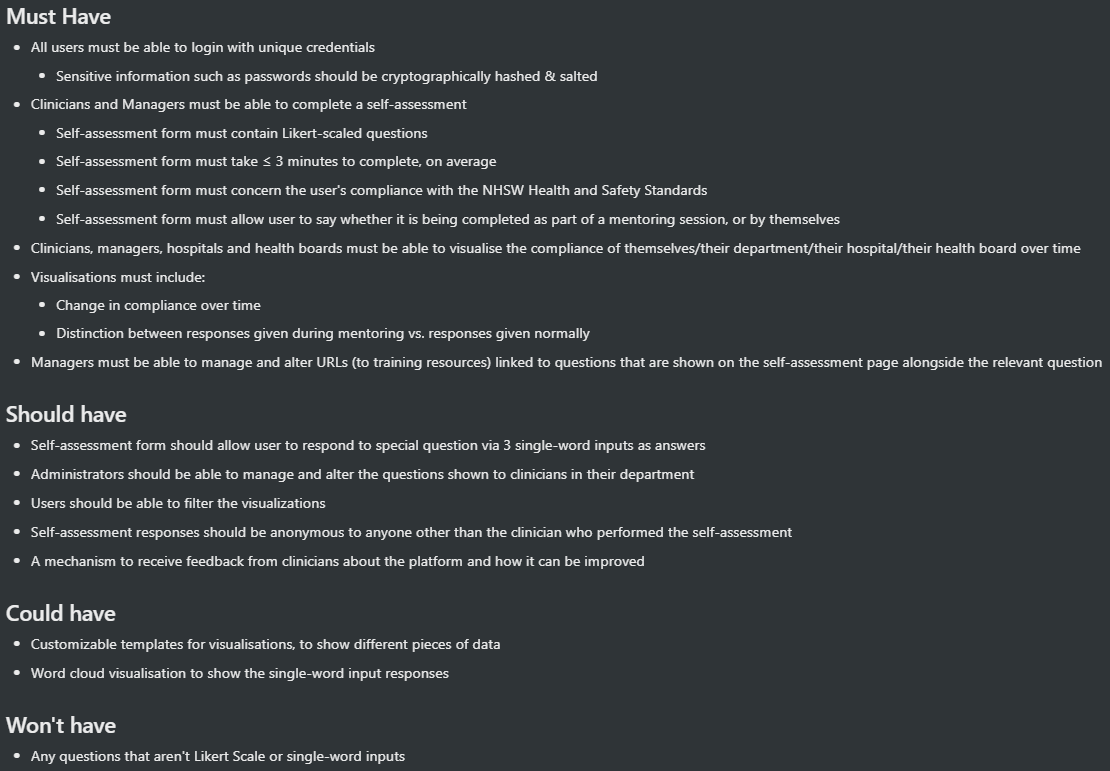
Our MoSCoW requirements can be found below:
Human Computer Interaction
The first big stage of our project was HCI - Human Computer Interaction. HCI is the design, implementation and evaluation of interactive computer systems focused on the users, as the system being built is for users and to help users. This was a great base for our project as we began with a user centred approach ensuring the system is actually effective and efficient for the user to use.
This was split into 2 sections, all detailed below:
-
Gathering Requirements, Personas, Scenarios
You can read more about these areas in our Week 2 blog post.
-
Sketches, Prototypes, Evaluation
You can read more about these areas in our Week 3 blog post.
Interviews/questionnaires
We began by taking a closer look at our project details and deciding what we would actually need to ask our users for our research to be useful and concise.
As this was just the beginning of our project it was imperative that we did not go into fine details so we needed to ask general questions that would both stimulate our users to give their honest opinion and their own ideas of how the system should work.
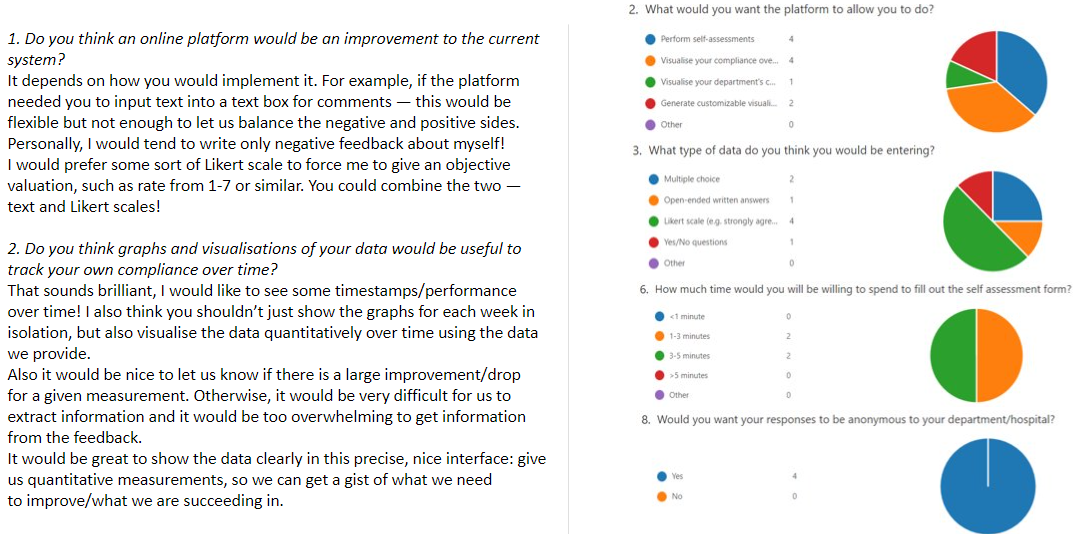
These are excerpts from the final interviews/questionnaires we agreed on:
Personas
After analysing and going over interview/questionnaire results we had a better idea of our users and what they want so we could move on to build personas for each of our main user groups: a clinician, department manager and head of Hospital/Health Trust.
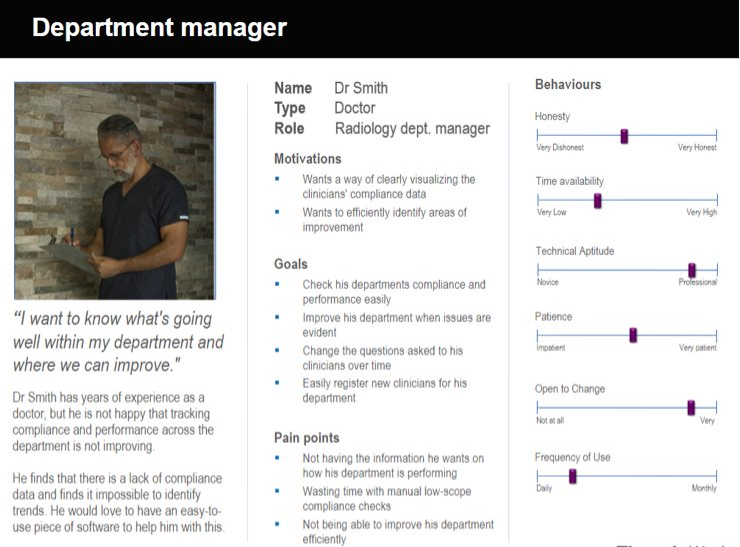
We had to focus on the most important details that would be relevant to how our system is built. We ended up with 3 very informative personas; an example of one follows:
Scenarios
Once we finalised our user personas we created scenarios to get a full understanding of the problem, our users’ pain points and goals. These acted as a great summary of the requirements we gathered, which we have referred to during development; an example of one follows:
Sketches
After knowing our requirements clearly, we then sketched the first version of our product on paper but we were struggling with the most optimized design for the dashboard.
We used Miro as a tool to remotely collaborate on our design sketches. After making our sketch and getting feedback from our users, we discussed and iterated them to come up with these final sketches:
Prototype
Our sketches formed the basis of an interactive prototype we created using Figma. We then asked a user to interact with this via Zoom screen-share and the Figma Present functionality. We used this to evaluate our prototype and found possible improvements which we added to create a finalised prototype which can be found here.
Research
Stack, Frameworks, Libraries & Components
Early on in the Term, we decided on using a JavaScript-based stack throughout the project.
Our reasoning for this was that we would more-or-less have to use JavaScript for the web-application due to its dominance in the web field. As a result, using the same language for both the backend and the frontend would simplify the learning curve for the team, and allow us to focus on implementation rather than learning languages.
Our final core stack, framework, and library choices are:
-
Next.js as our React framework for the web-application and server-side API routes running on Node.js
Our client initially suggested Django (Python), however due to our decision of using primarily JavaScript, we researched for alternatives and discovered Next.js.
Next.js appeals to us as it is a React framework which has consistently been the most popular frontend framework over the last 5 years. As a result, it has an enormous amount of support and documentation available, and Next.js’s focus on being the React framework specifically means it also has a lot of support.
In addition, Next.js has features like server-side rendering (akin to Django) and has useful development features such as hot-reloading, which has proven extremely beneficial over the last few weeks of development.
-
Material-UI as our base design system, providing various React components which are used in our web-app
This was chosen as there was a large amount of support and documentation available. Moreover, it has explicit support for server-side rendering which is important as we are using the Next.js framework.
-
Next-Auth.js to handle authentication on the frontend, connecting to our Keycloak instance
This was chosen as it has an extremely simple and developer-friendly API and usage, meaning we could delegate a lot of the interaction between the frontend and Keycloak to this library.
It also has useful support to extend the default behaviour through the use of Custom Providers (Keycloak in our case), Authentication Callbacks, and Events — all of which we use in our current codebase to handle authentication effectively.
- PostgreSQL for our Relational Database Management System
-
Prisma as our Object Relational Mapper, to handle interaction with the database from our API routes
We decided to use an ORM as it would simplify the developer experience greatly, as it abstracts away the need to use SQL to perform complex queries.
In addition, the type-enforcements provided by an ORM mean we make less mistakes as developers, so we can focus on getting our platform working and usable.
-
Keycloak as our Identity and Access Management service
This was recommended to us by our client and had many features that we required, such as single SSO, custom identity providers, user federation, and being Dockerisable.
In addition, it seems to be the most popular open source project of its kind, meaning it has the greatest amount of support available.
- Docker and Docker Compose for containerisation, to make the system easily deployable
Our production server is in the form of a Linode Virtual Private Server instance, which was kindly provided to us by our client.
Login System
A large chunk of this Term consisted of research of various login options we can use in the system.
Our aim is for the Care Quality Dashboard to be used effectively and integrated into the NHS.
As a result, we wanted a simple, easy-to-use, frictionless login system that ‘just worked’ for those using it.
Naturally, using the official NHS login system seemed like the best fit as it would mean users could login with their existing credentials, using the existing highly secured NHS login system. Crucially, this would provide our system with important information about users such as their department, hospital, and therefore we could determine their access rights.
We discovered that there are various possibilities if we wanted to use an NHS login system:
-
We discovered NHS Identity whilst researching for potential login options in the NHS. After some research, we filled in a Service Assessment Questionnaire and sent this over to the team. We were delighted to have a meeting scheduled with them towards the end of the Term.
In this meeting (performed over Teams), we discussed our project, our requirements, NHS Identity, and potential next steps.
They informed us that we would be able to use NHS Identity, albeit with some important notes such as needing to have a penetration test performed on our system, and that staff in NHS Wales may not have an NHS Identity account unless they had e.g. a smart card.
Whilst this was promising, they also provided us with a contact in NHS Wales, who we have gotten in touch with and hope to hear back from.
Whilst we investigate all our other options, we are putting this avenue on hold.
-
Digital Health Ecosystem Wales
Following a few emails with the team with regards to problems registering on the developer portal, we were able to schedule a meeting with the team towards the end of the Term,
Unfortunately our meeting this Term was cancelled. We will now meet with them in the first week of January 2021 where we hope to discuss our project, requirements, and potential next steps.
In particular, as this is the NHS Wales team, we hope that it would be more suitable for our platform as it would authenticate staff working in NHS Wales.
-
This was suggested to us by the NHS Identity team. There seems to be an OpenID Connect authentication method provided by NHSmail which seems promising.
From our initial research, we are required to complete a form and request access to the OIDC authentication method, which we endeavour to research further and learn more about.
As we are aware that the timescales for approvals in the NHS may take several months, and that we might not be able to accomplish this in time for the project deadline, we decided to implement Keycloak as our authentication ‘middleware’, which runs as a separate Docker container in our system.
This provides a simple username-password authentication system where credentials are stored in our Keycloak database. A summary of our Keycloak implementation is as follows:
- We have a Keycloak container in our Docker Compose configuration
- A custom Realm (in the form of a JSON file) is imported on creation of the Docker Container to configure the Keycloak instance with e.g. our custom Client and Roles
- A custom bash script runs in our PostgreSQL Docker Container to create the additional
keycloakdatabase used by the Keycloak instance - We have configured a Custom Provider in NextAuth.js in our web-app to interact with this Keycloak instance to handle authentication
- Whenever a user logs in, we make sure our own database is synced with the Keycloak database by performing a Prisma
upserton theuserstable, to ensure we have the logged in user’s ID in our own database, and their role (user_type)
If it turns out we can use an official NHS authentication method, we will be able to configure Keycloak to use the NHS system as an Identity Provider.
Development
Project Management
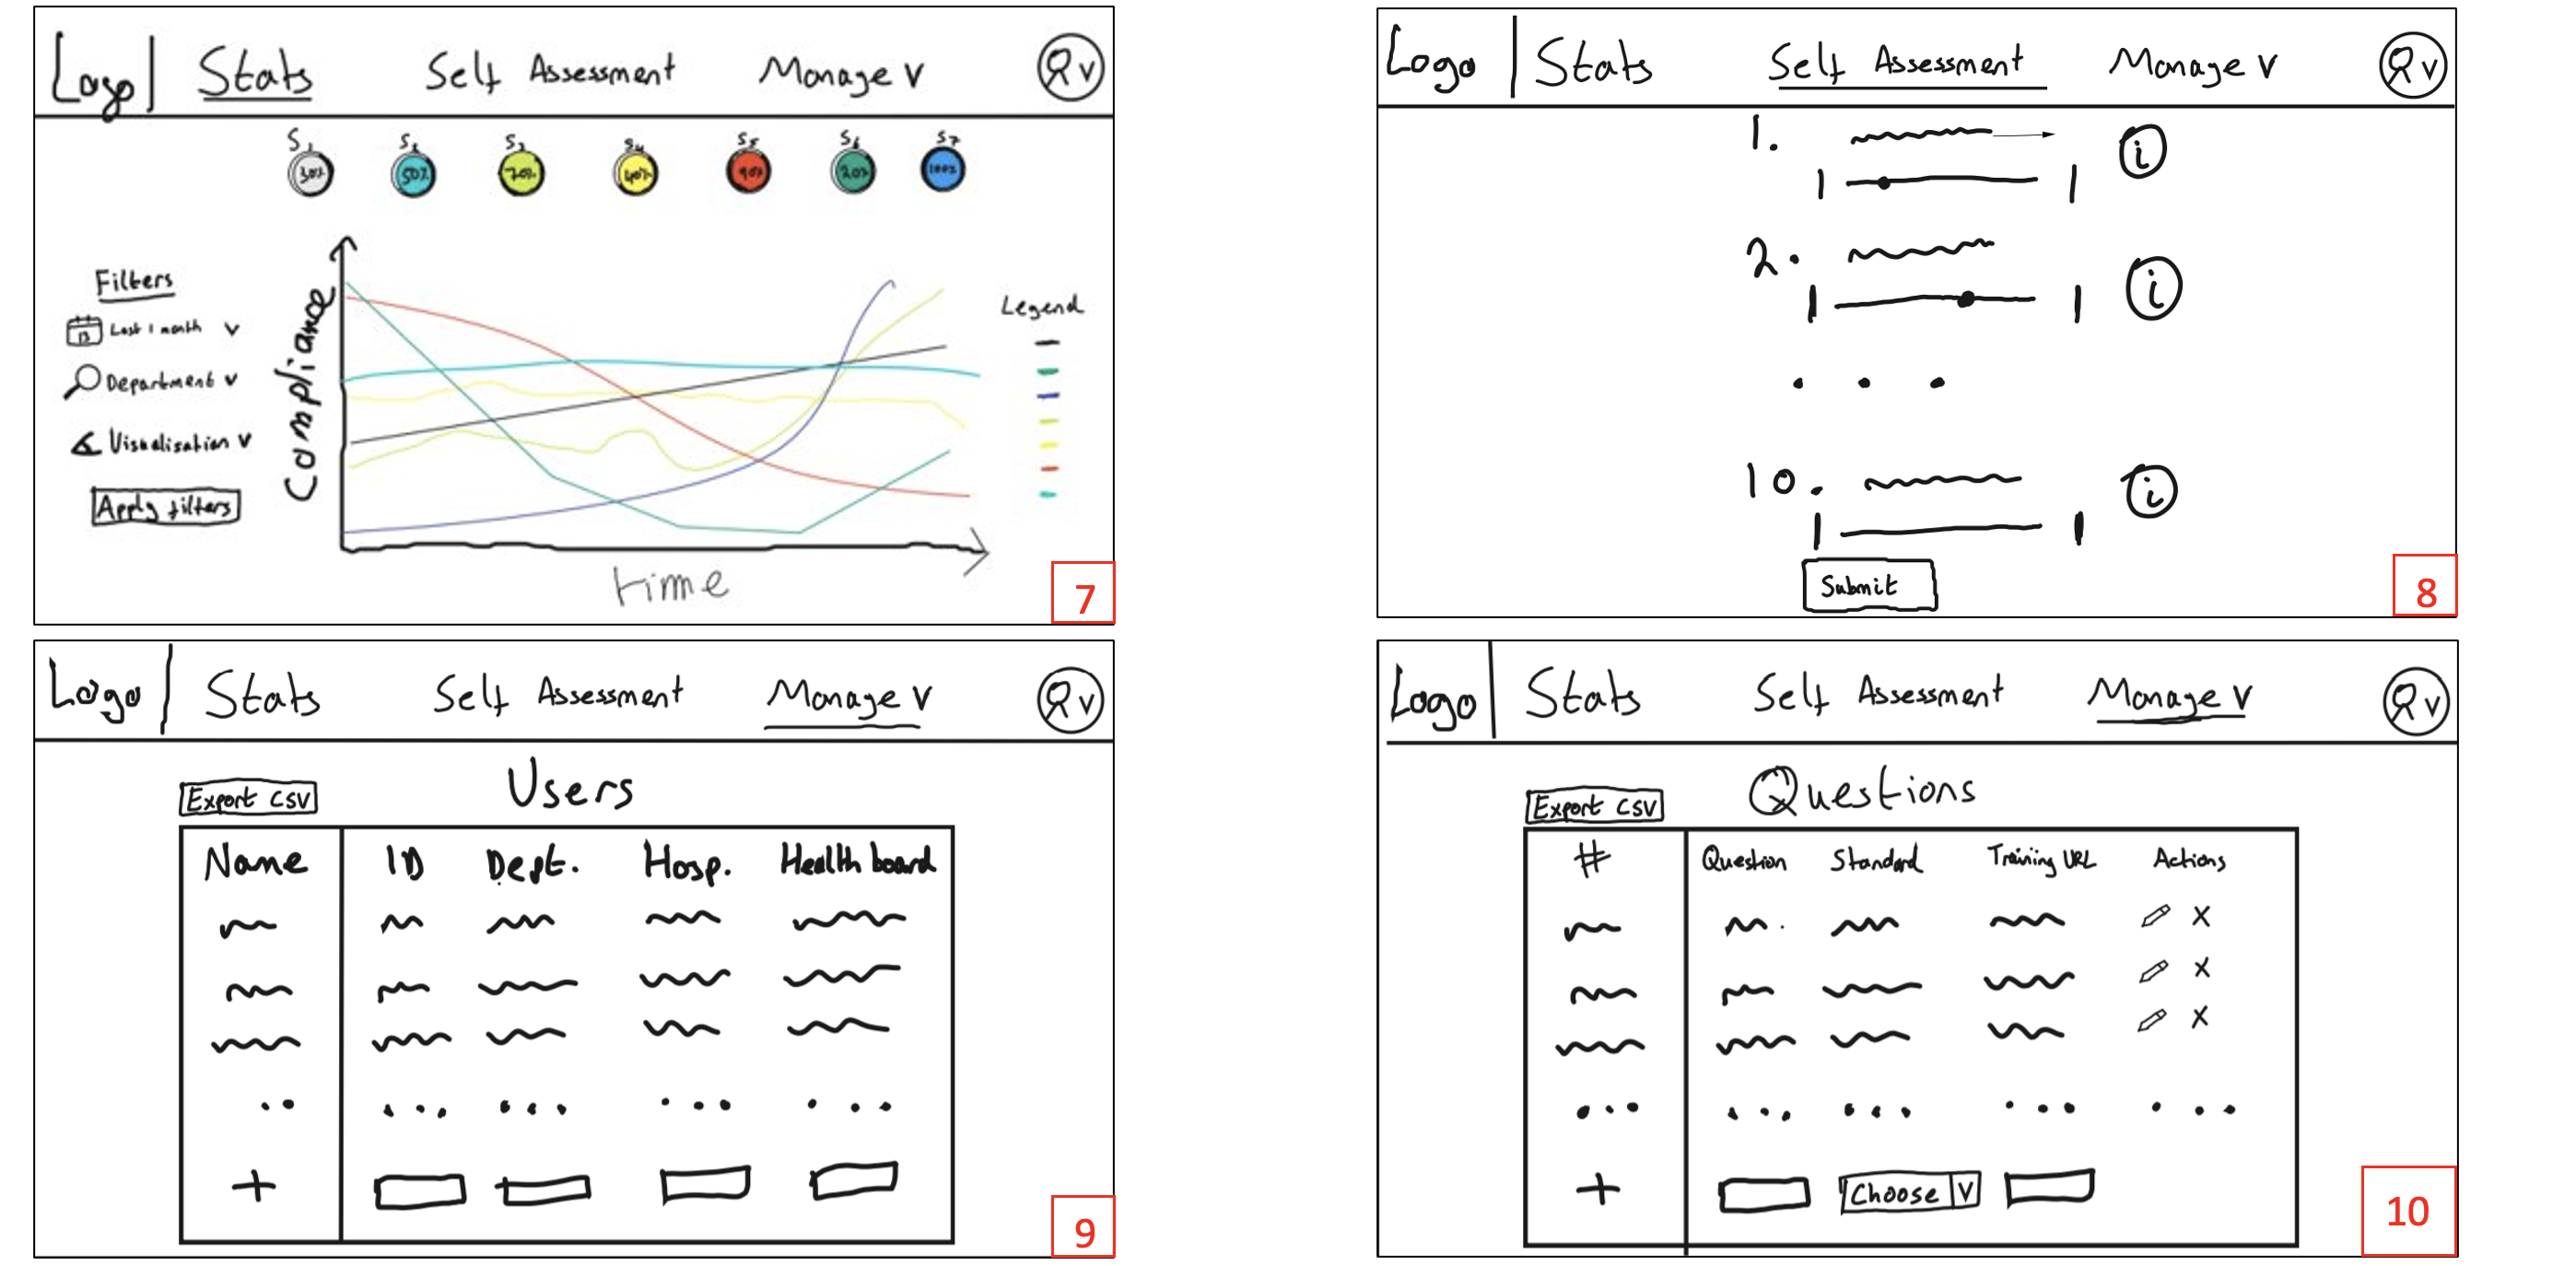
Throughout the development phase of the project, we have utilised all of GitHub’s handy project management features. An example of what our Issues page looks like is below:
As you can see, we have created Milestones to track progress related to our self-defined core milestones, various labels to track which areas our issues pertain to, assigned individual issues to ourselves, so we can keep track of who is working on what at all times.
Going forward, we have set our Milestones as: MVP and Polishing. For the MVP Milestone, we hope to complete a fully functioning MVP with all required features implemented, so we can polish the code up, improve tests and documentation in the Polishing phase, ready for handover to our client. We’ll also perform user-testing in this phase.
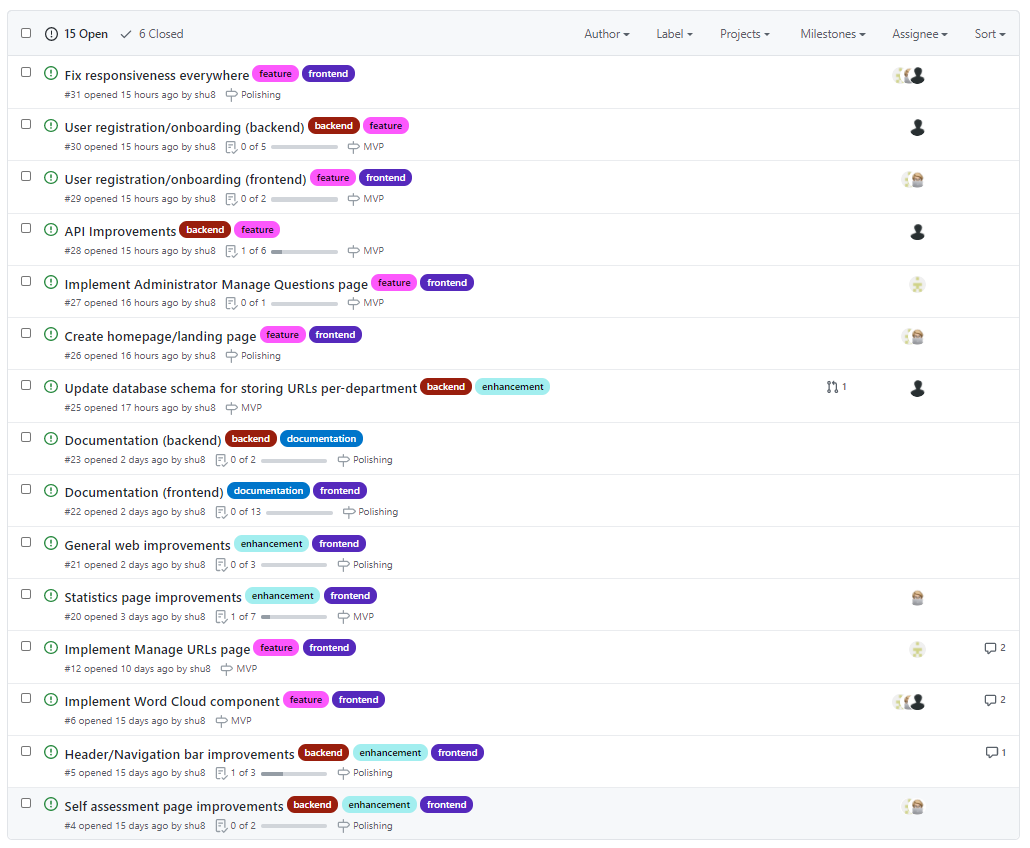
We created a GitHub Project board to provide a Kanban-style board detailing our issues and progress, to help keep track of the overall progress of the project:
Furthermore, we are using Pull Requests for all major code changes, so all our code is reviewed by at least one other team member!
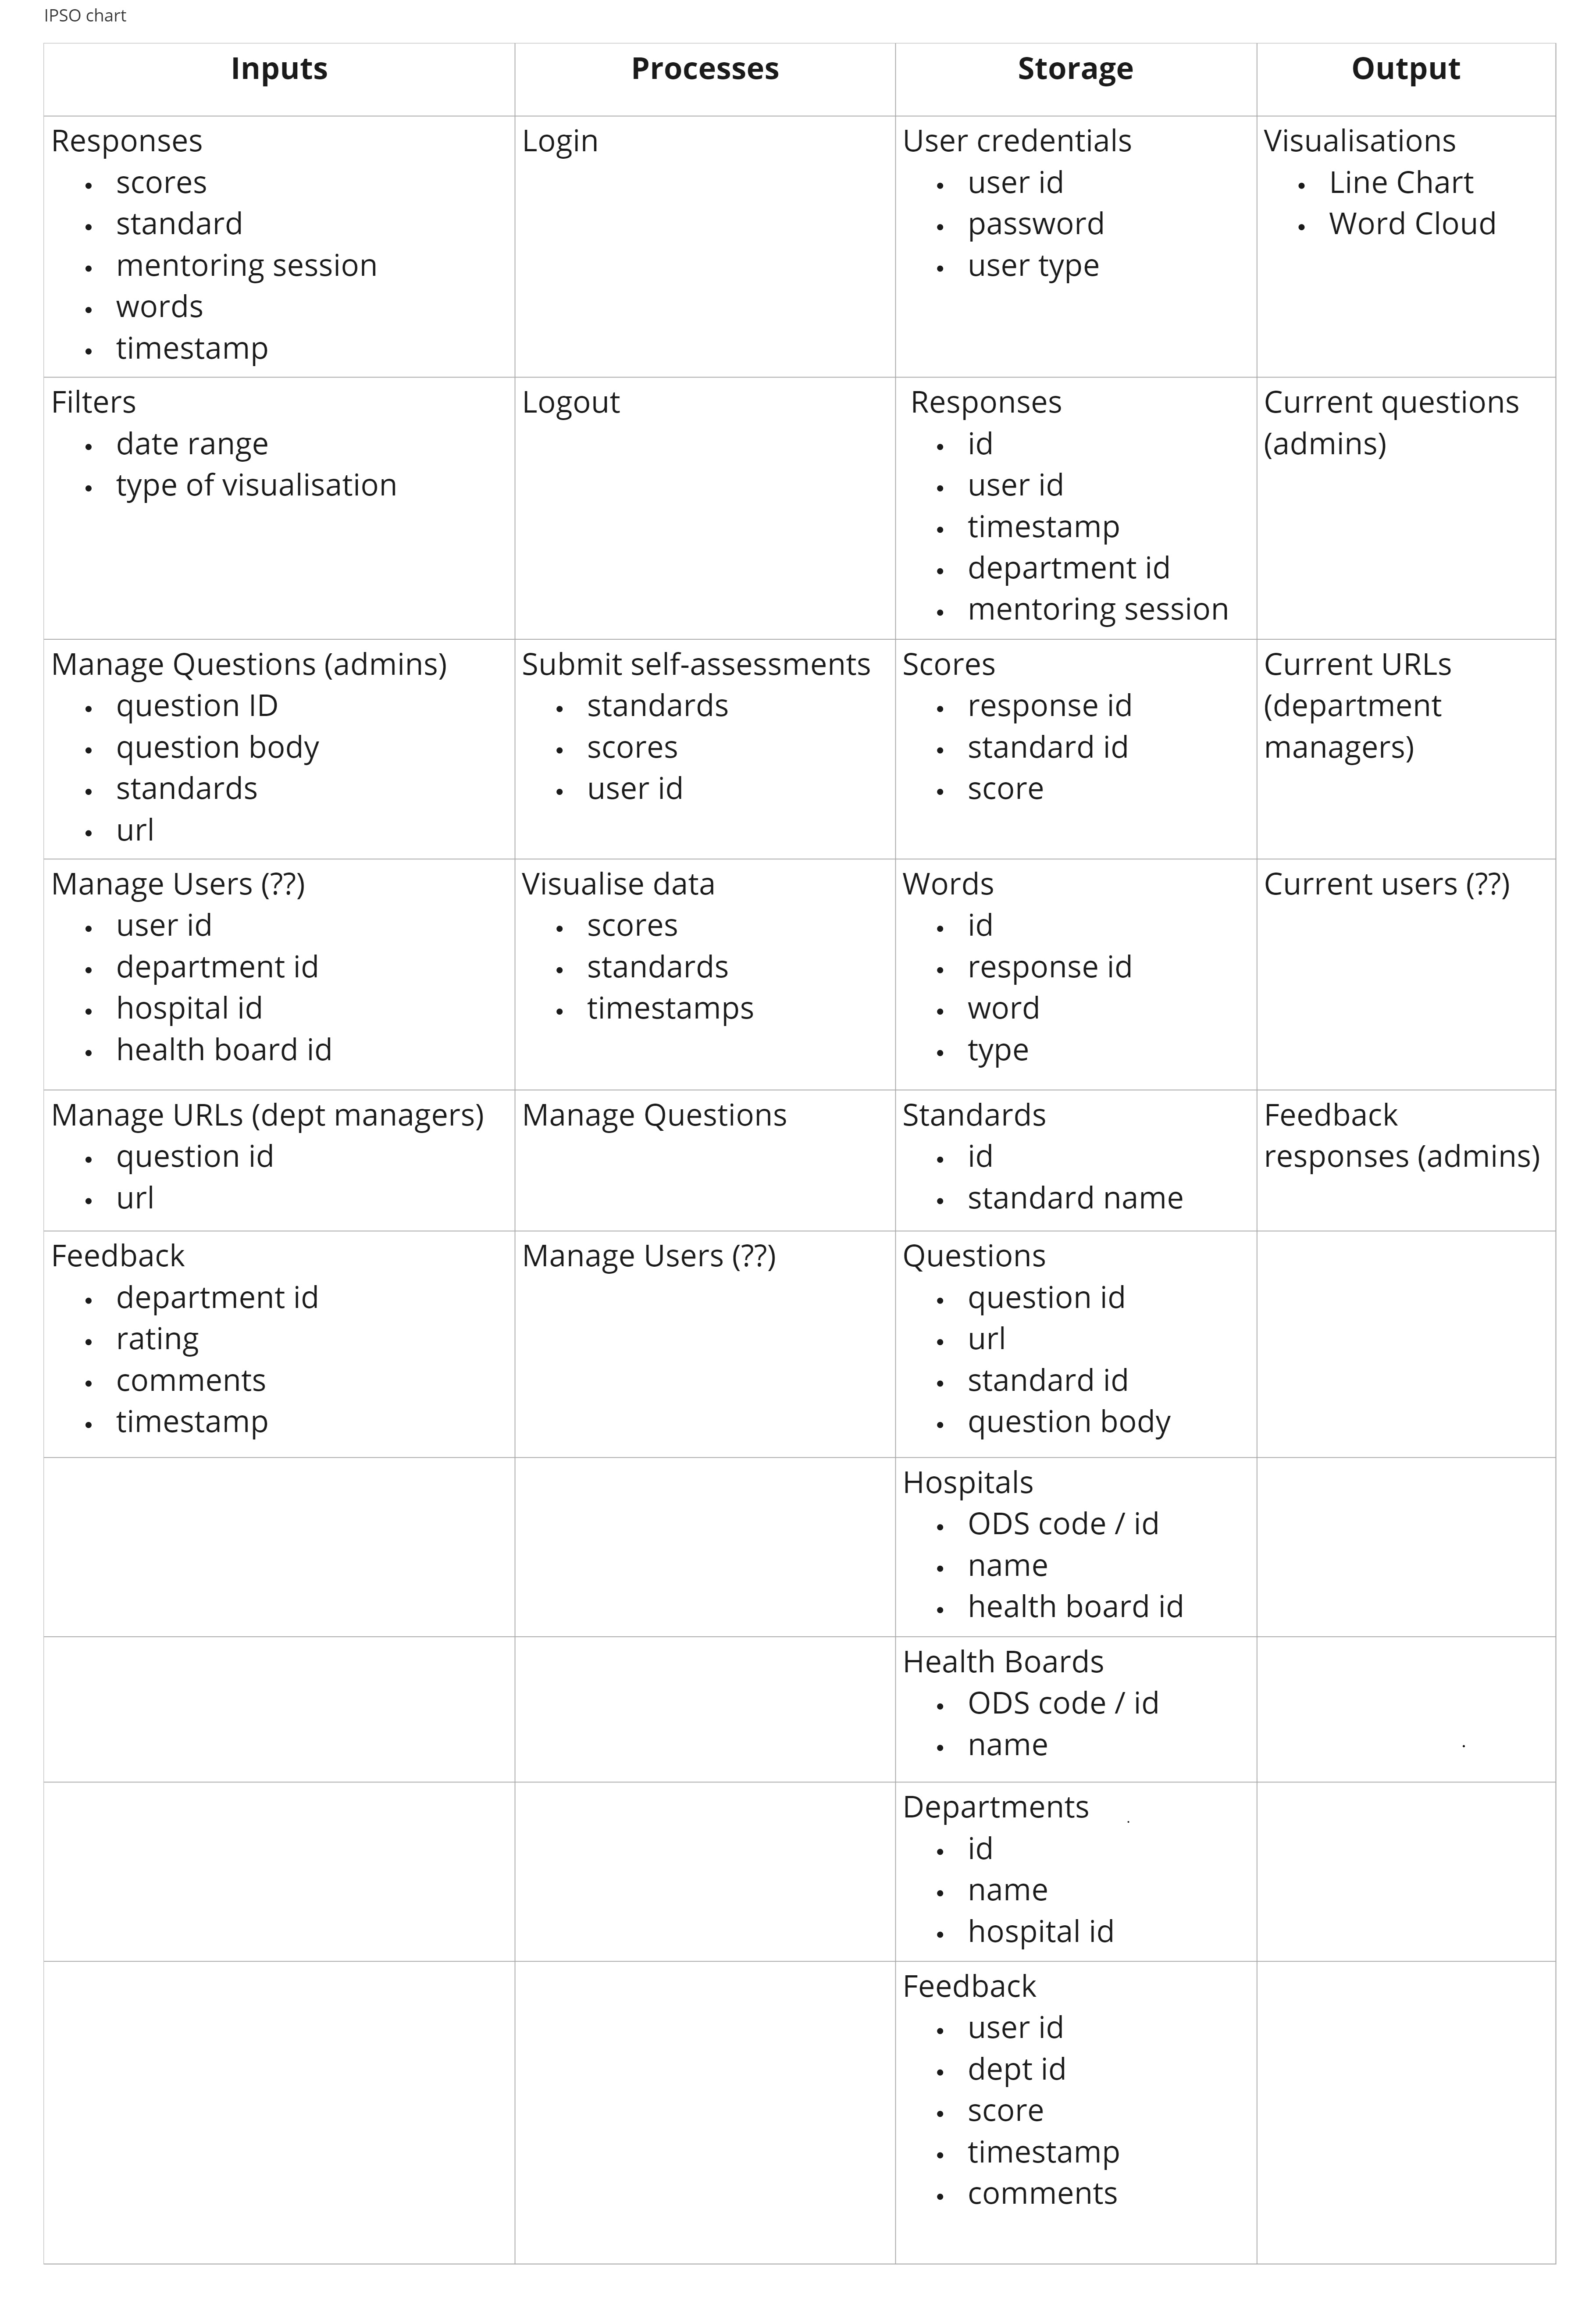
Database
We started by creating an IPSO chart (collaborating remotely via Miro) near the beginning of the Term to help us think about our data storage requirements:
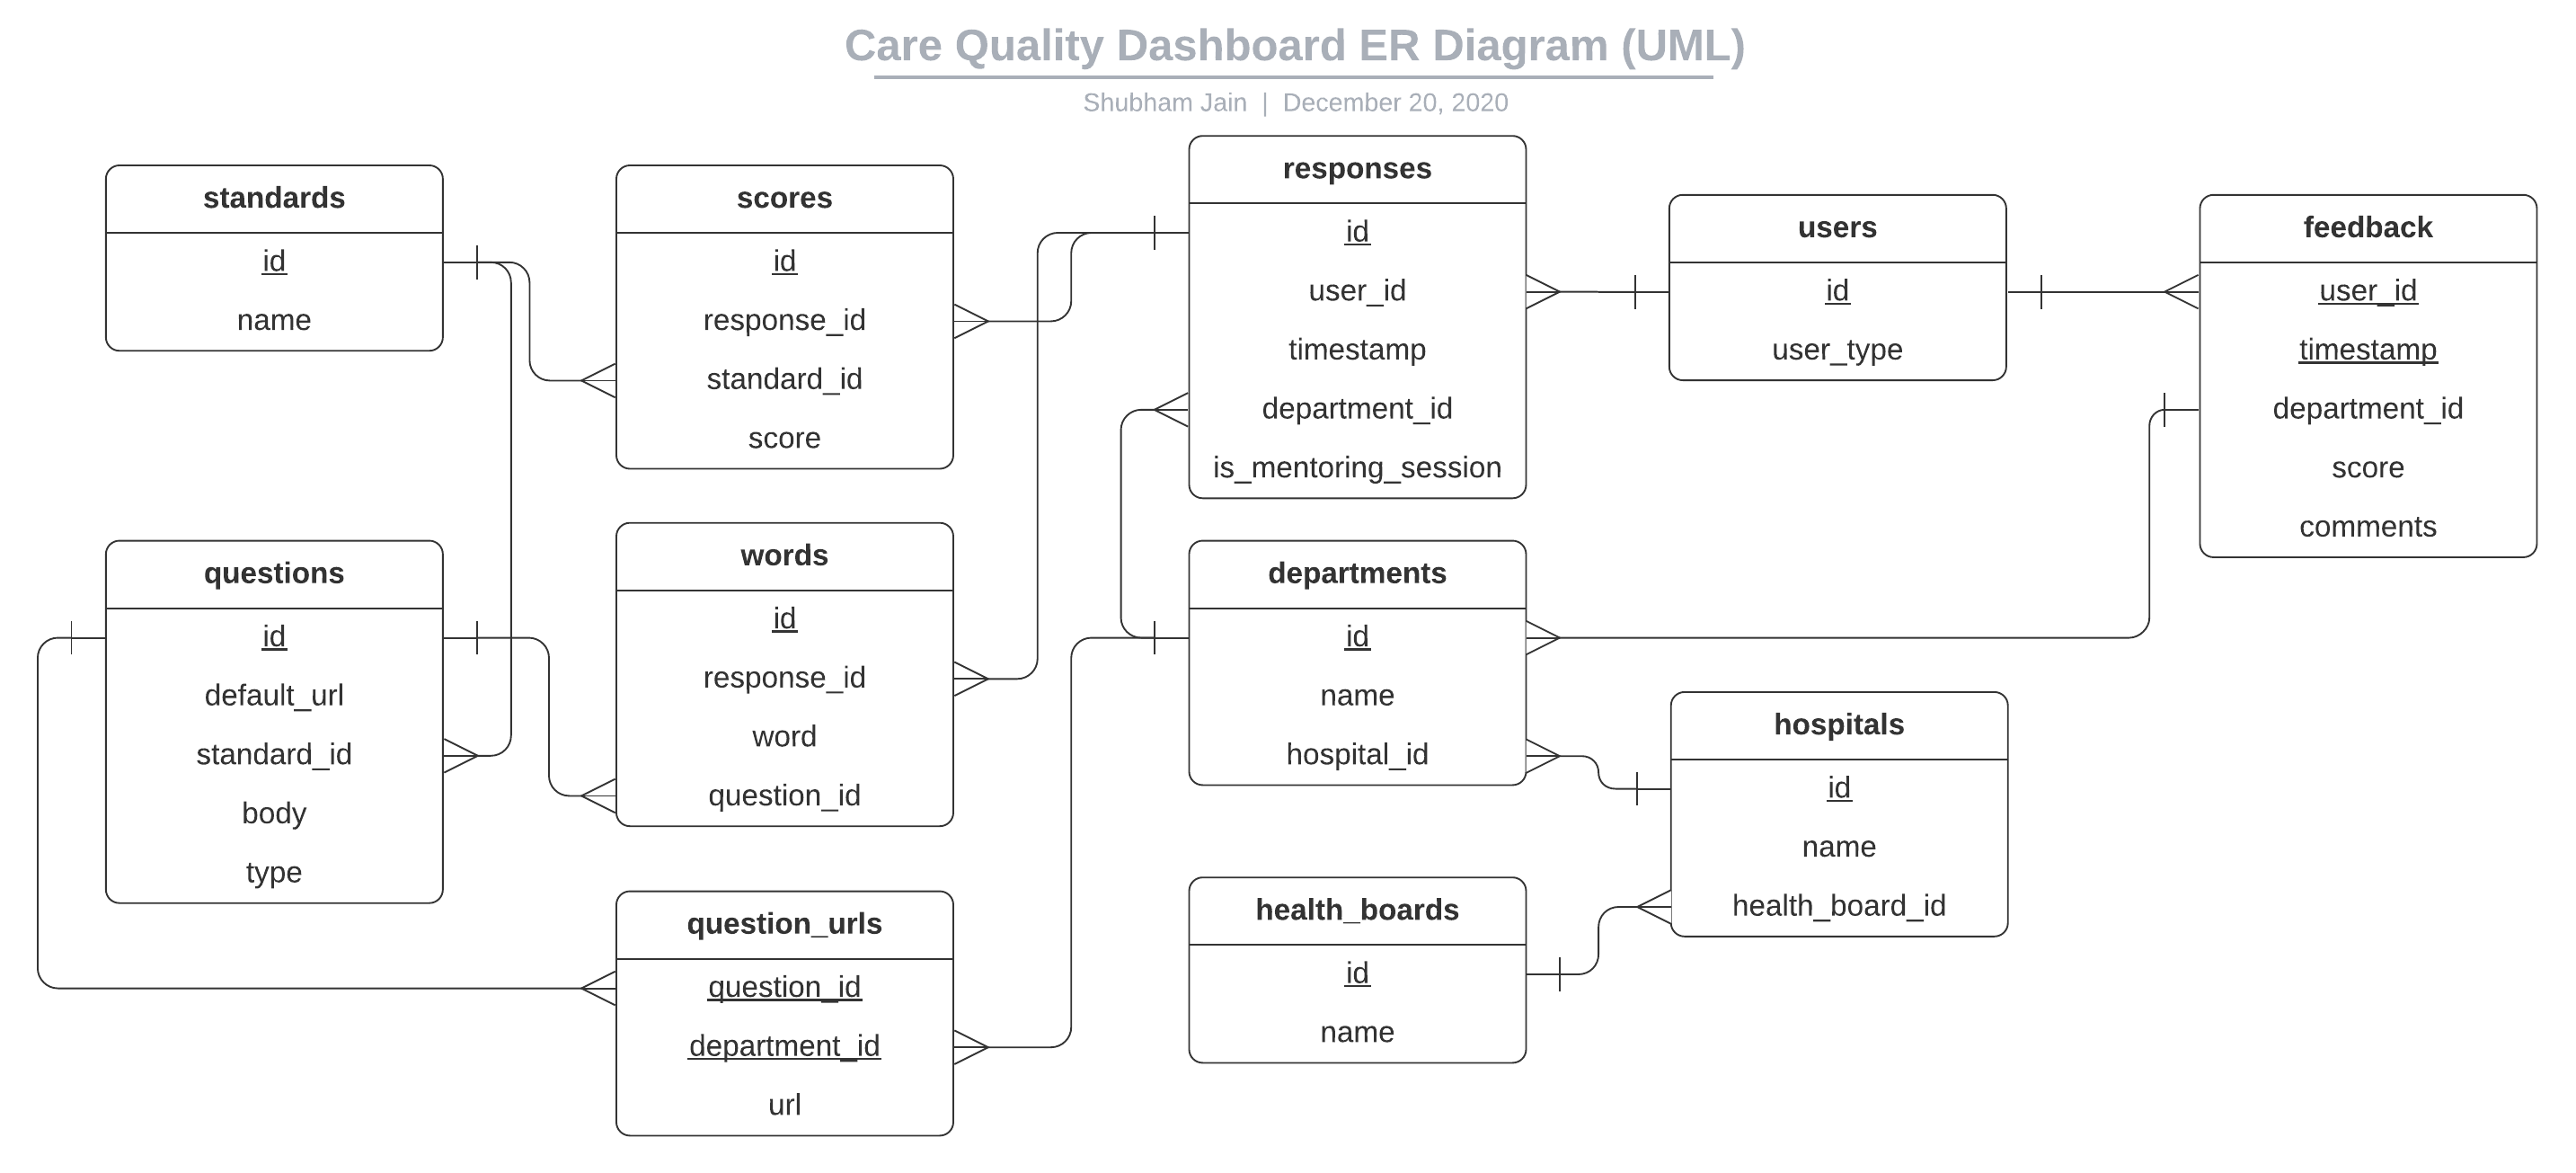
We then designed a database schema, which we’ve iterated on a few times over the Term as more implementation details are considered. At this moment, our database schema looks like:
Frontend
-
Navigation bar
This is displayed on every single page, with different looks depending on the logged-in user’s type. For example, health boards would not see the self-assessment nor manage options.
This was implemented by looking at the user roles that come from our Keycloak login system, and rendering the appropriate option(s) based on this.
More details can be found on our Week 6 blog post.

-
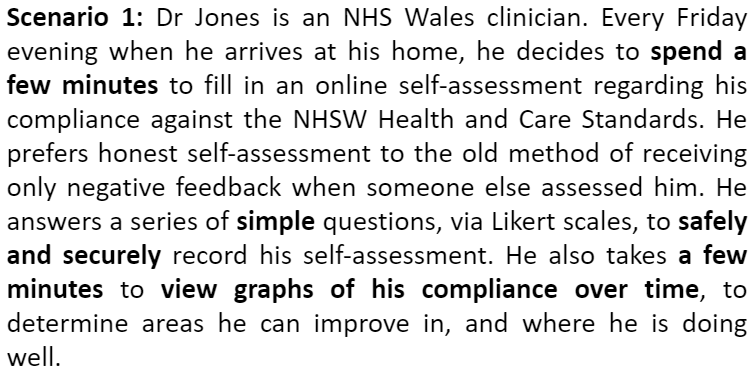
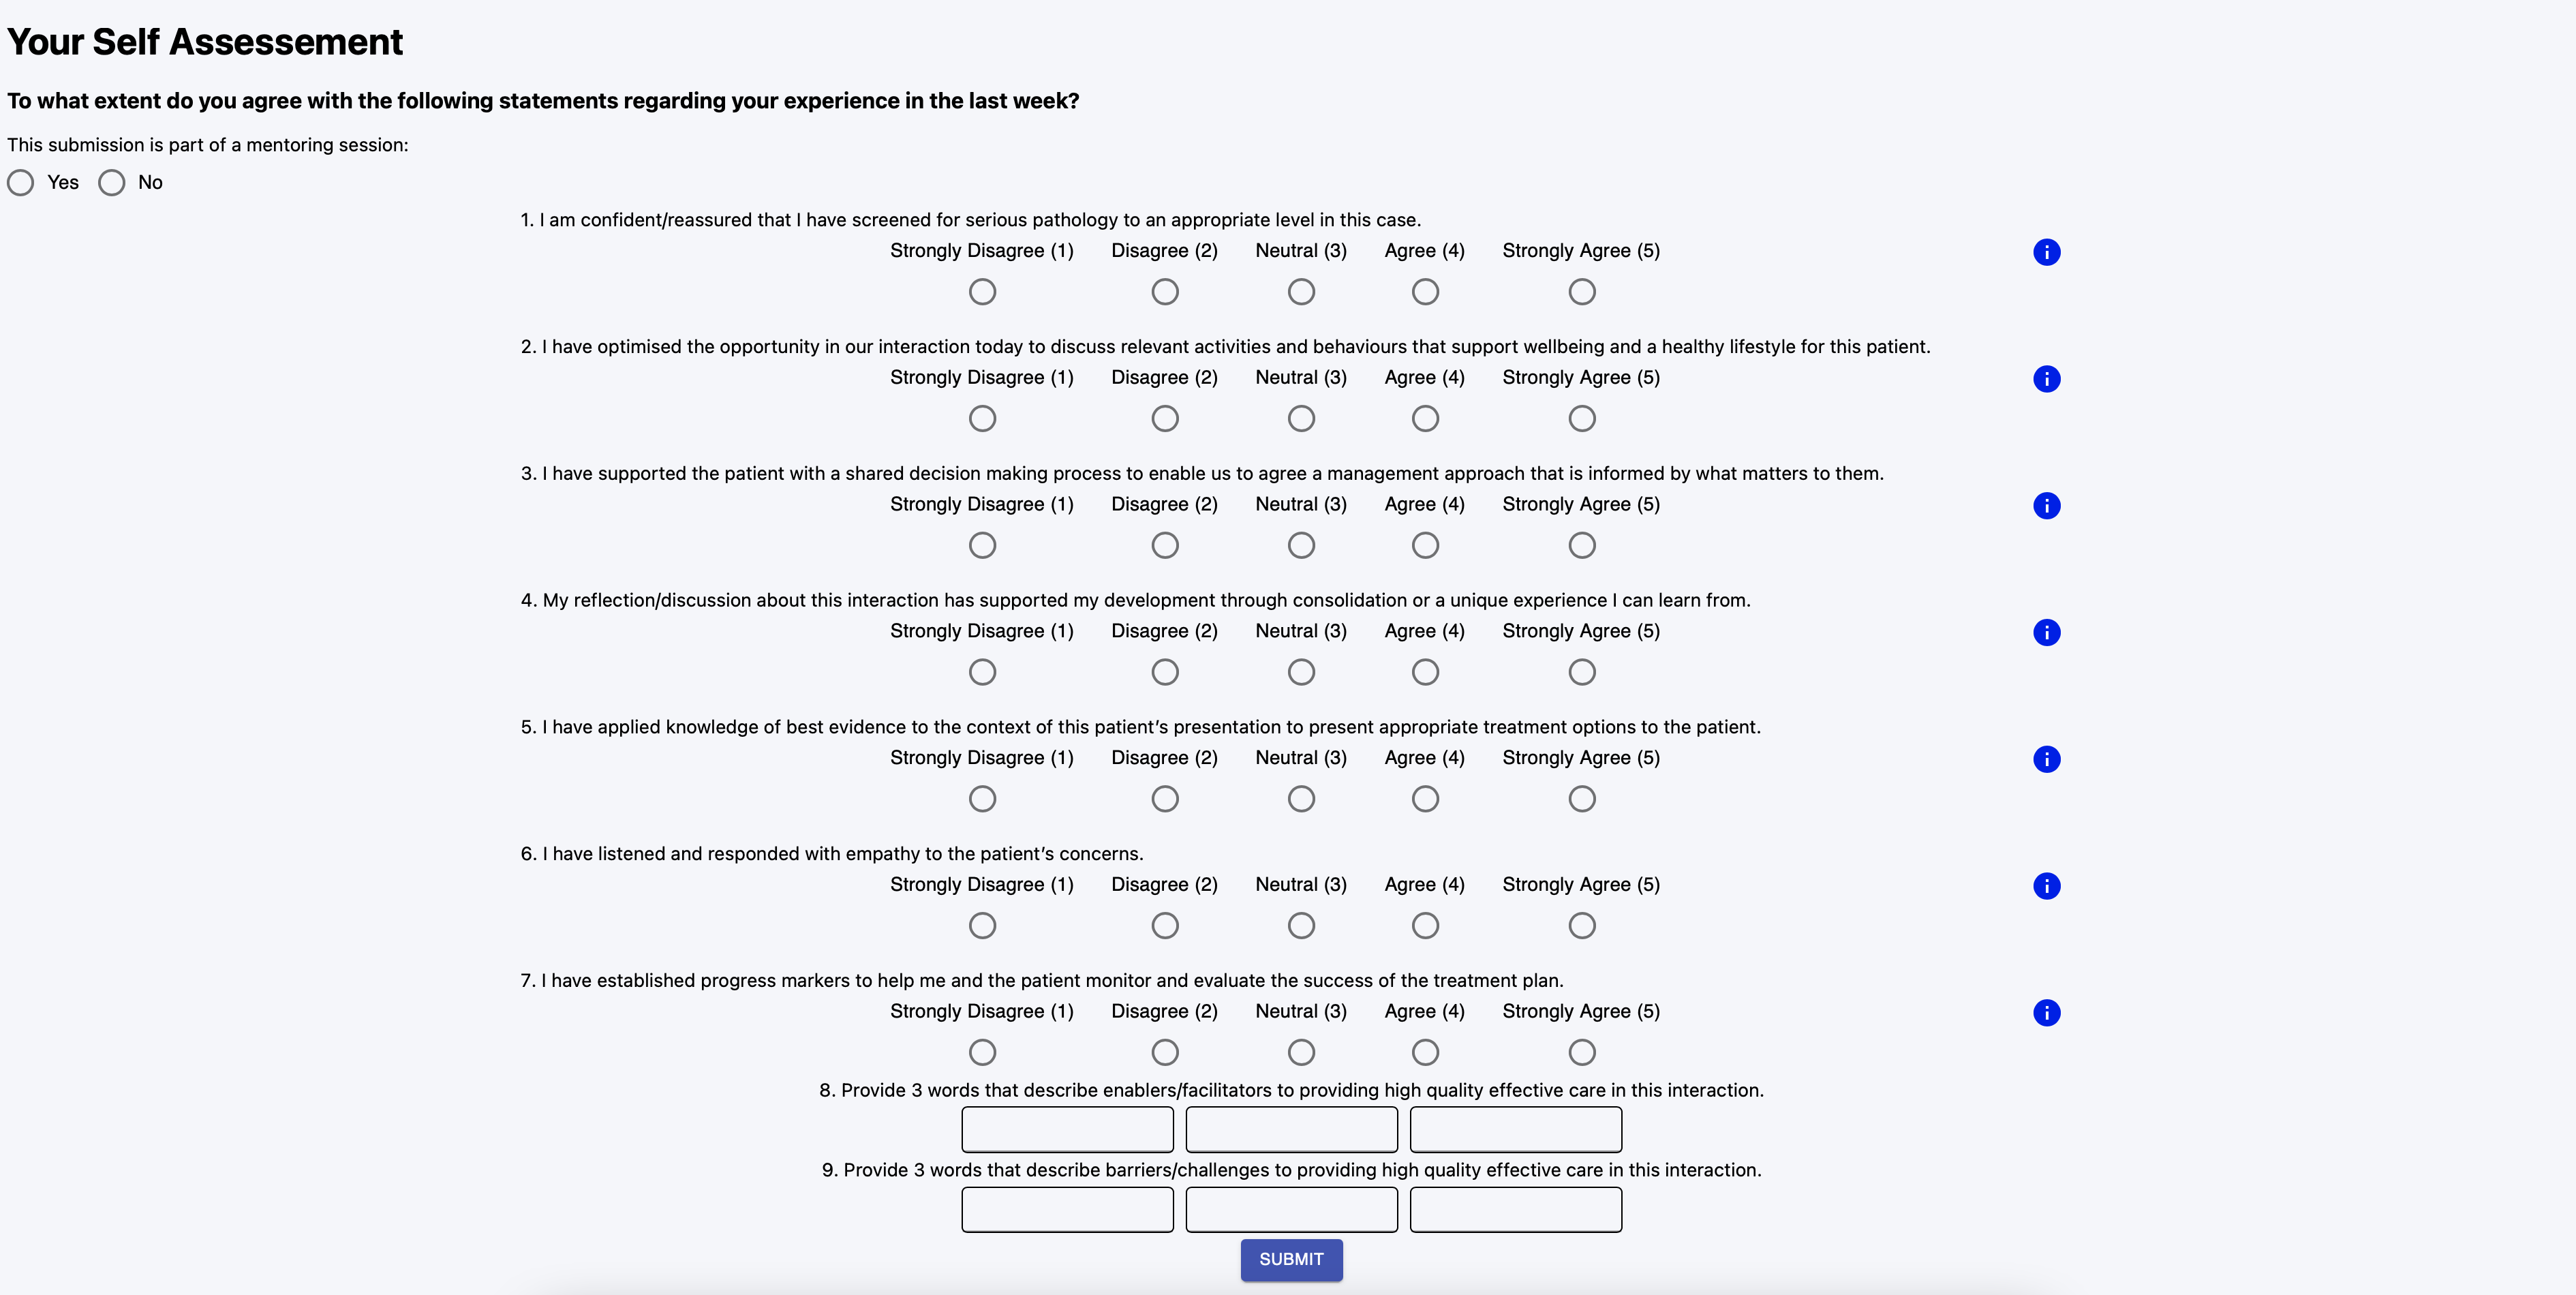
Self assessment page
This page consists of several custom-made components, such as a
LikertScaleandInfocomponent. We also haveLikertScaleQuestionandWordsQuestioncomponents that render individual questions, based on their type.We also implemented client-side validation logic to ensure all questions have been answered, and added a modal dialog that allows the user to confirm their submission to prevent accidental entries.
This has also been connected to the database via the
POST /api/questionsAPI endpoint, ready to be used in the Statistics page.More details can be found on our Week 6 and Week 7 blog posts.
-
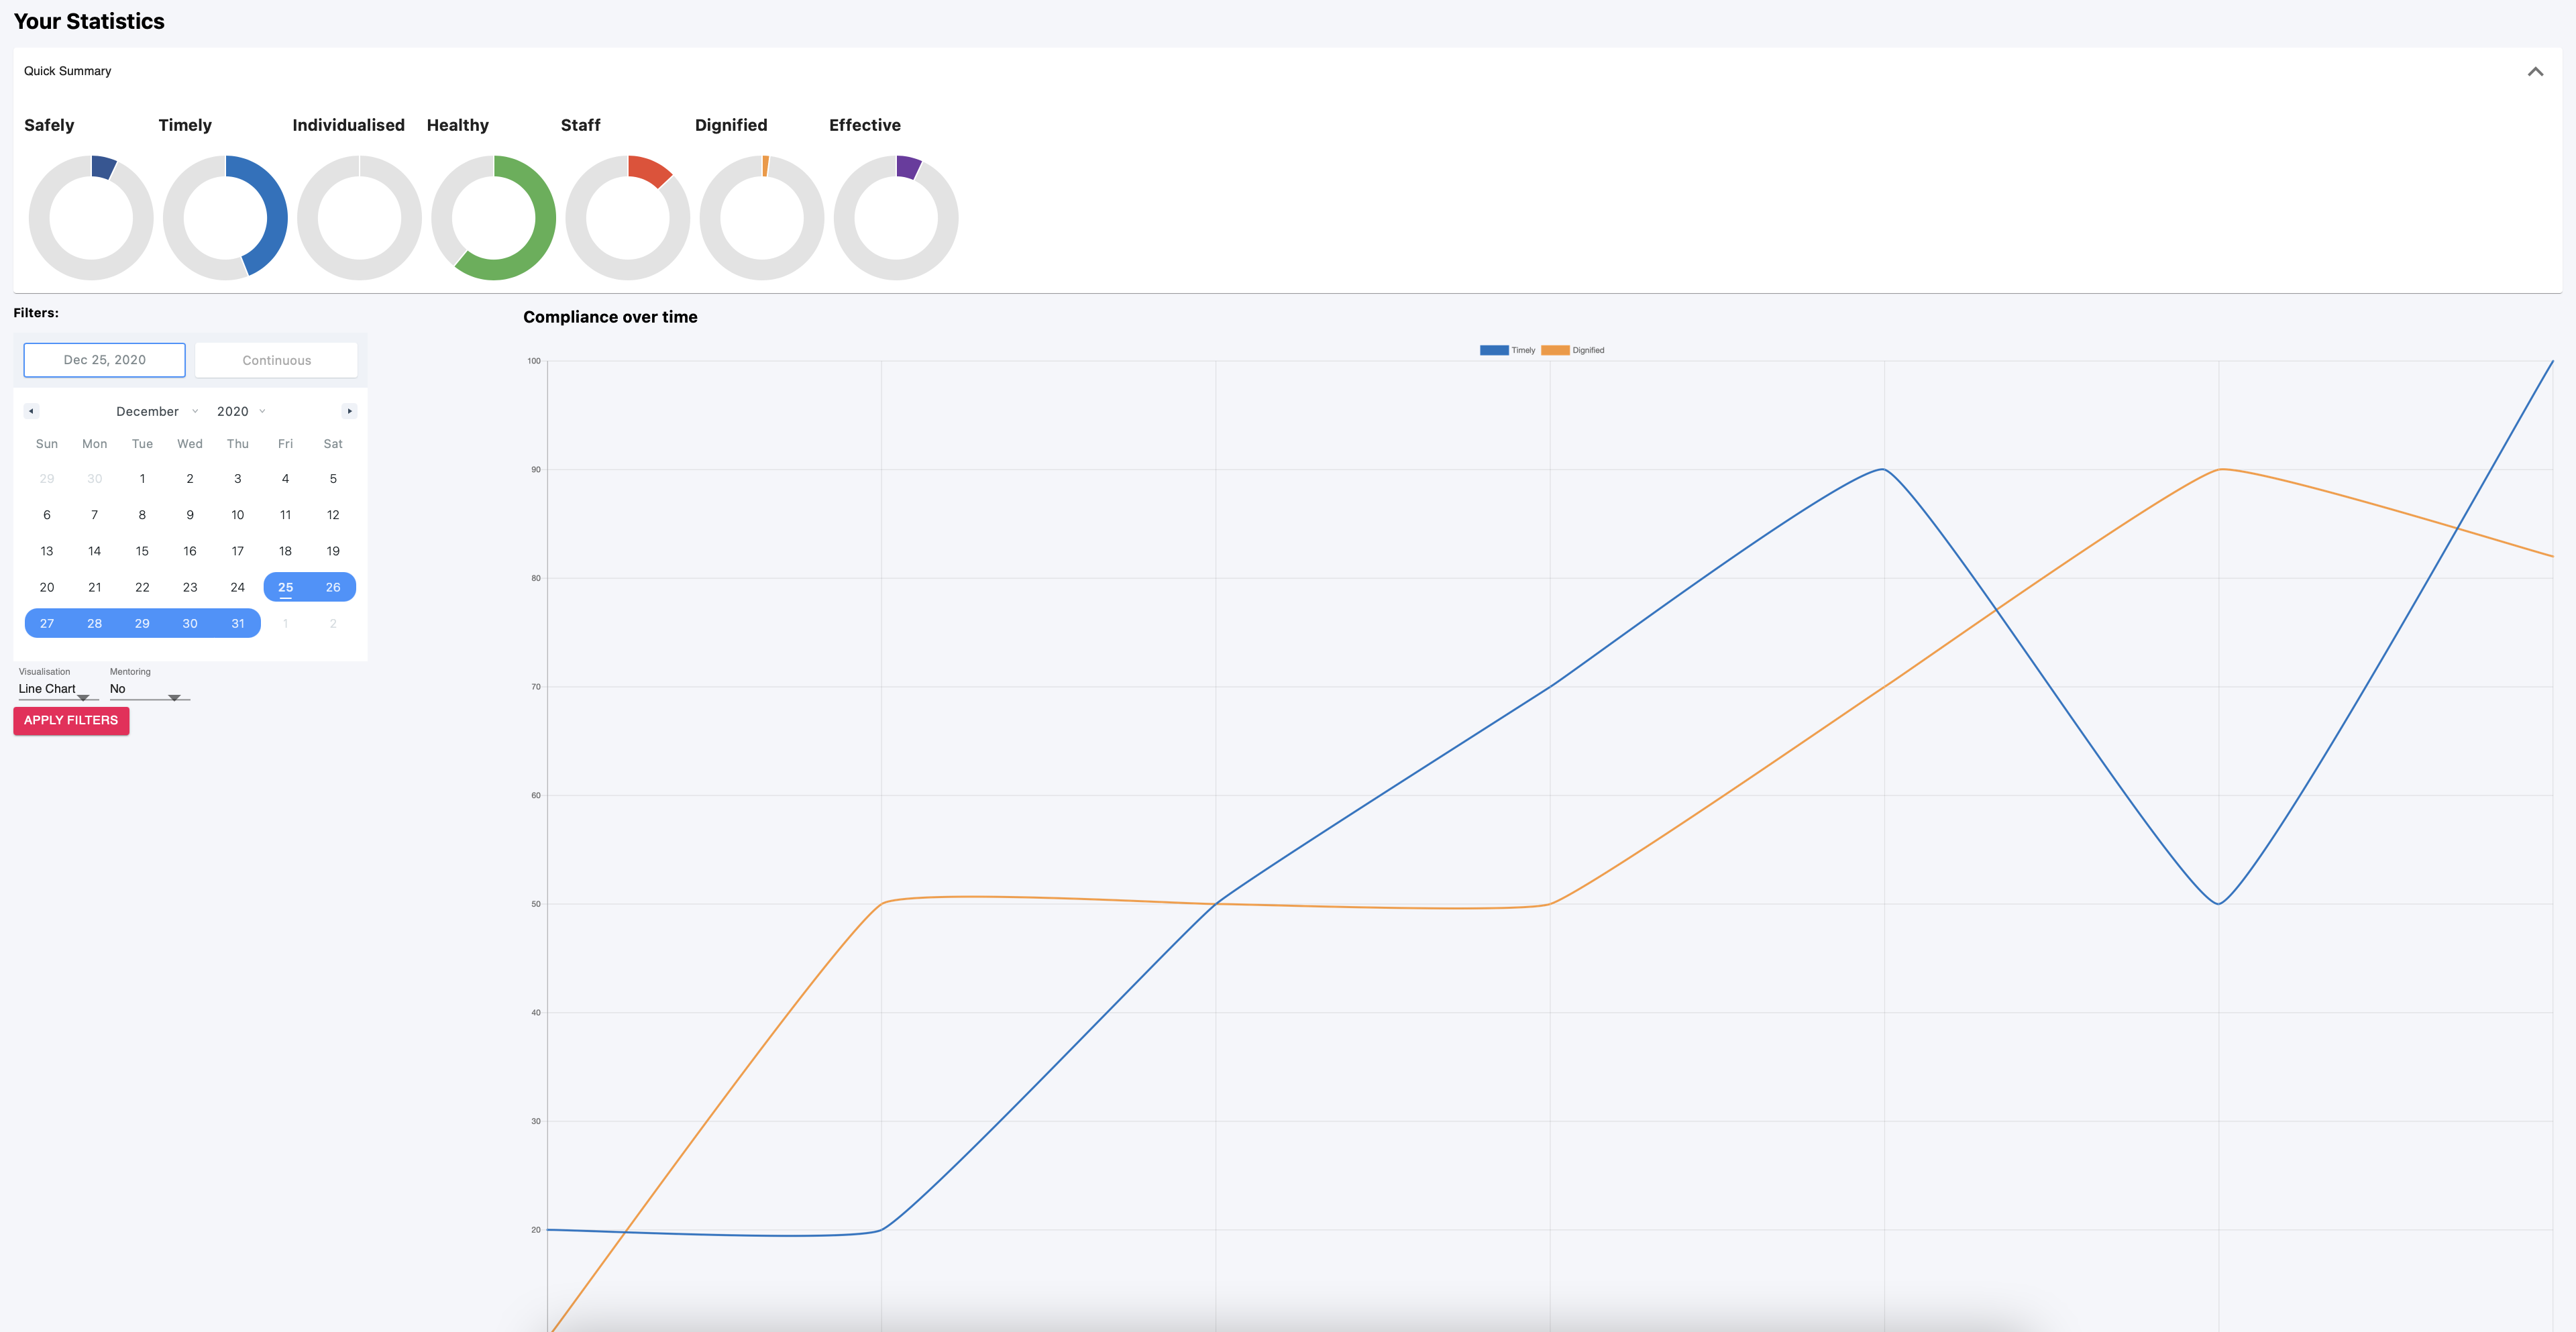
Statistics page
This page consists of several custom-made components, such as a
Accordion,Filter, andLineChartcomponent.We are also using the Chart.js open-source JavaScript charting library along with an open-source React wrapper
react-chartjs-2to implement the line chart and a ‘donut’ graph to implement the average compliance circles.We’ve also made use of the
react-date-rangeopen-source library to implement the date picker/calendar that can be seen below.You can find more details in our Week 6, Week 7, and Week 8 blog posts.
-
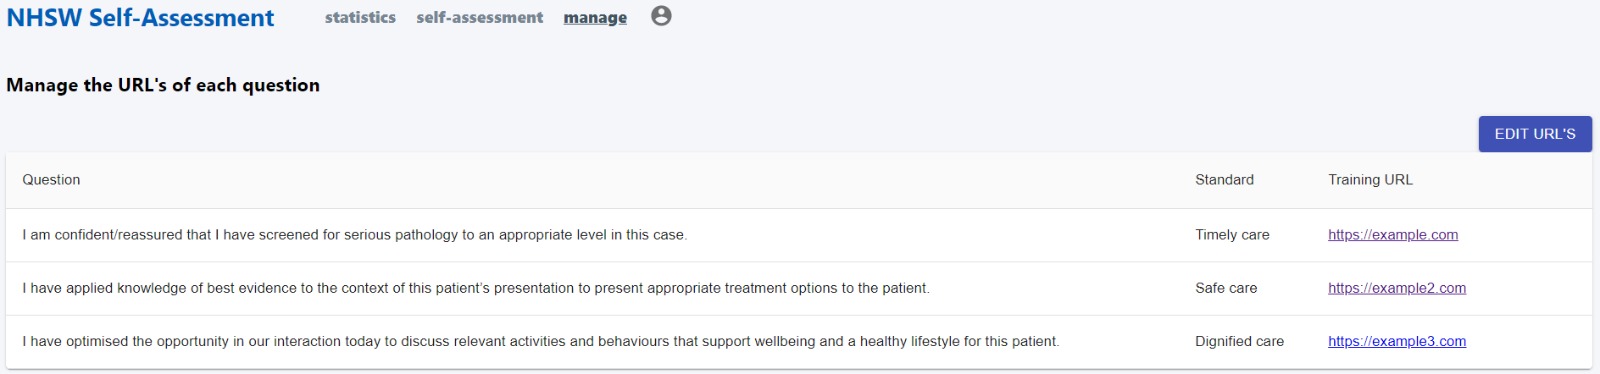
Manage URLs page
This consists of a Material UI table that displays a list of all the current questions in the system and their URLs. At the moment, these questions are hardcoded into the page, but we will be working on connecting this page to the API in the coming week.
We use React state to keep track of which question is being edited, and to display a text field in the editing column of the question’s row.
You can read more details of the UI in our Week 8 blog post.
Backend
Our backend primarily consists of Next.js API Routes, which allow a straightforward solution to build a public-facing API built-in to our Next.js app.
The advantage of using Next.js API Routes was that we could use single central authentication logic, and easily parse session data in both the client and server, therefore making full use of Next.js.
To integrate the frontend with the backend, we’ve used the SWR React Hooks library. This is the library recommended and created by the Next.js authors, Vercel. We thought this was fitting as it was especially designed with Next.js in mind, meaning integration with our codebase would be extremely simple. We’ve found it very useful and simple to connect to the backend so far, and found some of its features such as automatic cache revalidation, to be handy!
This Term, we focussed on implementing the API routes to support the features implemented in the frontend, i.e.:
/api/responses- GET route to fetch all responses for the given user/department/hospital/health board
- POST route to save new responses to the database, tied to the logged in user
/api/standards- GET route to fetch all the current standards in the system
/api/questions- GET route to fetch all the current questions in the system
- POST route to create new questions, with the given standard, in the system
- PUT route to update the details of a question, e.g. the question body
- (pending) DELETE route to archive a question (we will not ever delete questions, as responses ‘word’ questions are tied to the question ID
/api/question_urls- PUT route to update the department-specific URL of a question
- DELETE route to delete the department-specific URL of a question (therefore resetting the URL to the default, global, URL)
/departments- GET route to fetch all the current departments in the system, for the logged in hospital
- POST route to create a new department in the system, tied to the logged in hospital
Going forward, we will be fleshing out the API to support all the required features of the frontend.
Continuous Deployment
As part of our DevOps practices, we have configured a Continuous Deployment workflow for the project. This involves the automatic deployment of our codebase from GitHub to our production (Linode) server.
Implementing this required research of our various options (more details can be found in our Week 7 blog post). Our final approach uses GitHub Actions to automate this process:
- Check out the code and build our web-app’s Docker image using our
Dockerfile - Publish the Docker image to GitHub Packages
- Connect to our server via SSH (using GitHub secrets to store a private key) and run a command along the lines of
docker-compose upto pull the latest image, rebuild, and restart the containers - Use Caddy Server on our server to act as a reverse proxy to our Next.js app running inside the Docker container
Next steps
Stay tuned for our future weekly updates, and Merry Christmas!